

To remove the headlight assembly on a 2006 GTO, first disconnect the battery and then remove the front bumper. This ensures the safe and accessible removal of the headlight assembly.
The Pontiac GTO, a beloved muscle car, demands attention for both its performance and style. Owners often find themselves needing to access the headlight assembly, whether for bulb replacement, upgrading, or repair. The process involves a series of steps that are straightforward if done with care.
2006 Gto Headlight Assembly Removal, Since the GTO’s headlight assembly is integrated into the vehicle’s front design, initial removal of the front bumper is necessary. This task requires a basic set of tools and some mechanical know-how. It’s important for car enthusiasts to tackle this process with patience, ensuring the car maintains its aggressive stance and visual appeal while ensuring safety with properly functioning headlights.
Introduction To The 2006 Gto Headlight Assembly
Owning a 2006 GTO means you are part of a unique group of car enthusiasts. Your vehicle’s aesthetics and performance stand out. Yet, visibility during night drives is crucial. This brings us to the headlight assembly, a vital part of your GTO’s safety features. Proper maintenance ensures you and your car’s safe passage through dark and stormy nights. Let’s dig into the world of the 2006 GTO headlight assembly.
Overview Of The 2006 Gto Model
The 2006 GTO is the final iteration of an iconic American muscle car. It boasts powerful performance and sleek lines. The car’s design complements its aggressive stance on the road. Enthusiasts appreciate its V8 engine that roars with power. Its headlight assembly not only frames the vehicle’s front facade but also serves a critical function in illuminating the path ahead.
Importance Of Proper Headlight Maintenance
- Safety: Clear visibility reduces the risk of accidents.
- Legal Compliance: Functional headlights are a legal requirement.
- Vehicle Value: A well-maintained car commands a higher resale price.
- Aesthetic Appeal: Clean, undamaged headlights improve your GTO’s look.
Maintaining your GTO’s headlights ensures optimum performance and keeps you safe on the road. Whether it’s replacing a burnt-out bulb or cleaning foggy lenses, comprehending how to remove and service your headlight assembly is essential. Follow along as we explain how to remove the 2006 GTO headlight assembly step by step.
Preparation For Headlight Assembly Removal
In the quest to improve your 2006 GTO’s radiance, mastering the DIY glow begins with meticulous preparation for headlight assembly removal. Whether you’re opting for headlights replacement or aiming to replace headlight components, a seamless process ensures a professional touch to your car’s illumination.
To kick off your journey, comprehending the nuances of replace headlights and replace headlight assembly is paramount. Begin by delicately assessing the existing setup, and gauging the intricacies of headlight repair. For a comprehensive overhaul, dig into the world of car headlight repair, where attention to detail becomes your greatest ally.
Adopt the challenge of replacing headlight assembly with confidence, and your GTO will soon boast a rejuvenated brilliance on the road. Stay tuned for expert tips that will illuminate every step of your DIY venture, turning your car into a guide of light of personalized style and functionality.
Tools And Materials Needed For The Job
To successfully remove the headlight assembly from your 2006 GTO, you’ll need certain tools and materials. Make sure you have the following items before starting:
| Tool | Purpose |
|---|---|
| Ratchet and Socket Set | For removing bolts |
| Screwdrivers | Prying and unscrewing (Flat-head, Phillips-head) |
| Trim Removal Tool | Detaching clips without damage |
| Work Gloves | To protect your hands |
| Headlamp or Flashlight | For better visibility |
| Clean Cloth | To keep parts clean |
Safety Precautions And Preliminary Steps
Your safety is paramount when working on your vehicle. Follow these precautions and preliminary steps:
- Disconnect the battery – prevent electrical shocks
- Allow the car to cool – avoid burns from hot surfaces
- Wear safety glasses – protect your eyes from debris
- Work in a well-lit area – see clearly to prevent mistakes
- Use a stable work surface – keep tools within reach
Once these precautions are in place, you can proceed with removing the headlight assembly safely and effectively.
Step-by-step Guide To Removing The Headlight Assembly
Removing the headlight assembly from your 2006 GTO can refresh the car’s appearance and improve visibility. This step-by-step guide details the process to safely and efficiently remove the headlight assembly.

Accessing The Headlight Assembly
Begin with a cool engine to avoid burns. Open the hood to access the headlight assembly. Clear any items blocking the headlight area. Need sufficient space to work.
- Locate the headlight assembly behind front bumper.
- Identify assembly retaining clips and screws.
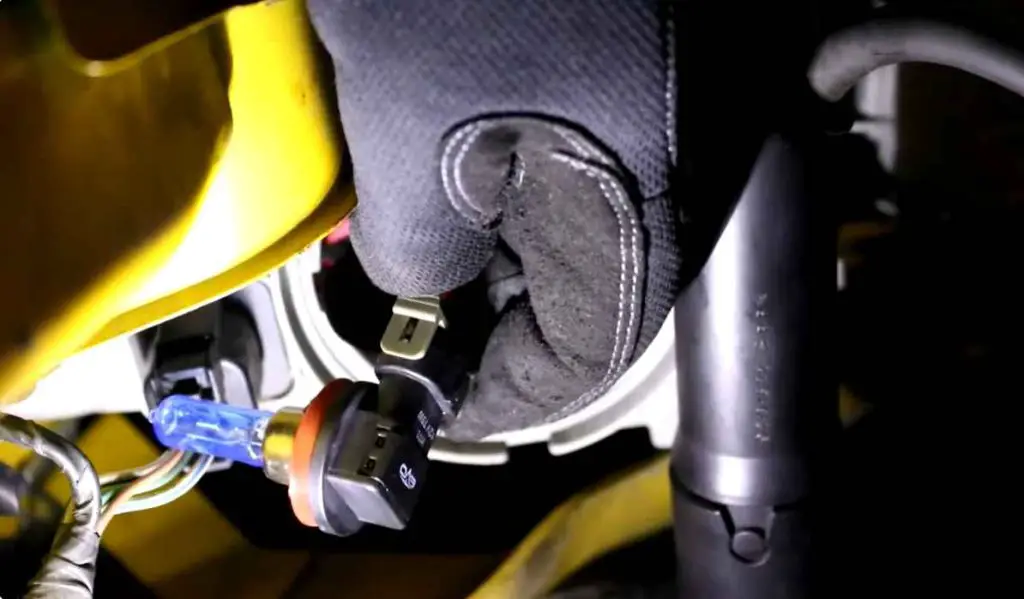
Disconnecting Electrical Components
Handle electrical connectors with care. They are fragile. Wear gloves to protect hands.
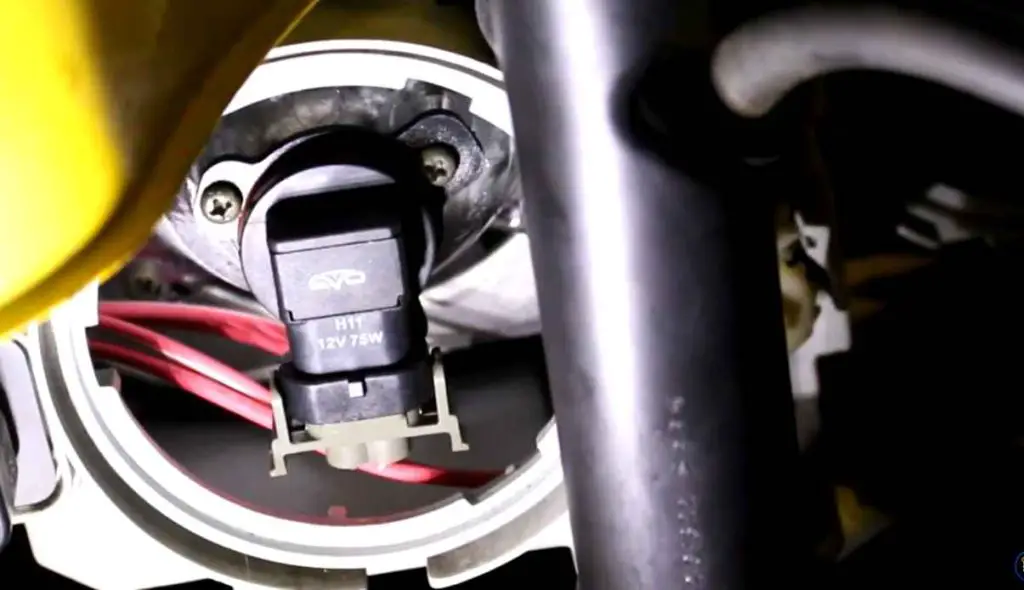
- Find the electrical connector at the back of the assembly.
- Push down the clip to release the connector.
- Gently pull to disconnect it from the headlight assembly.
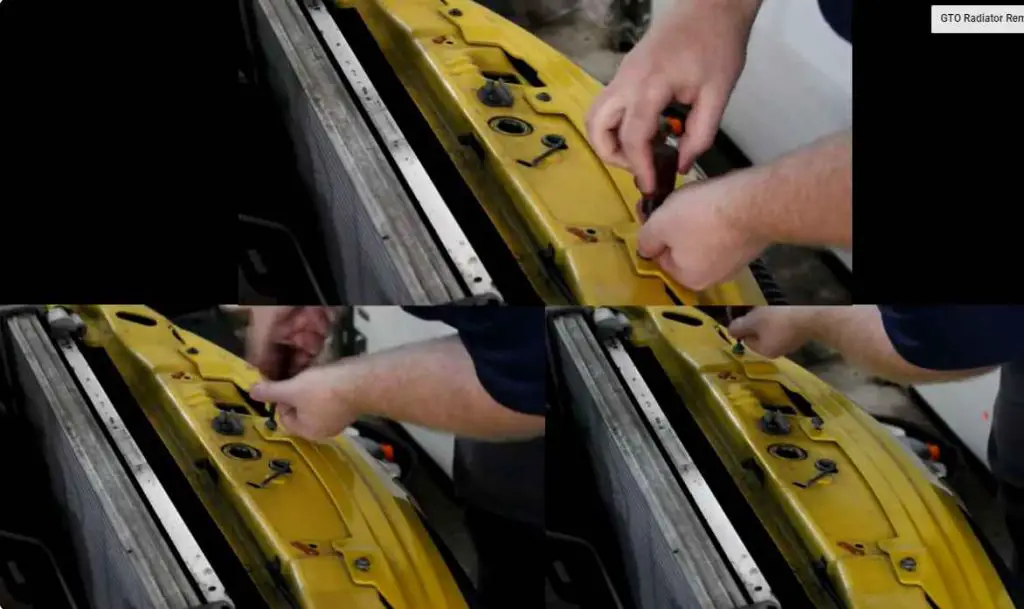
Removing Brackets And Bolts
With the electrical parts disconnected, focus on the physical attachments. Use proper tools to avoid damage.
| Tool | Action |
|---|---|
| Screwdriver or Socket Wrench | Remove screws and bolts securing assembly. |
| Hands | Gently wiggle the assembly to loosen. |
Take care not to scratch the paint as you remove the headlight assembly. Align new assembly in reverse order.
Troubleshooting Common Problems During Removal
Removing the headlight assembly from a 2006 GTO can be a tricky process. Issues with corroded screws or faulty electrical connections often complicate the task. This section digs into common problems and offers solutions to help you navigate these challenges smoothly.
Dealing With Corroded Screws And Bolts
Corrosion is the archenemy of screws and bolts. It often turns a simple removal into a frustrating task. When you encounter rust, follow these steps:
- Soak the corroded part with a penetrating fluid like WD-40.
- Give it a few minutes to work its magic.
- Use a manual screwdriver to avoid stripping the head.
In cases where screws refuse to budge, heat can help break the bond. Using a heat gun carefully on the affected area may loosen things up.
| Problem | Solution |
|---|---|
| Stuck Screws | Penetrating Fluid + Manual Effort |
| Seized Bolts | Apply Heat + Manual Effort |
Handling Electrical Connection Issues
The headlight’s electrical connection can also pose a challenge. Here’s what to do when unplugging wires and cables:
- Turn off the car battery to prevent any electrical accidents.
- Locate the headlight harness connector.
- Press down on the clip and gently pull the connector apart.
If the connector seems stuck, do not force it. Apply a dab of dielectric grease and wiggle the connector out gently.
Disconnecting wires demands patience and a gentle touch. Damage to cables or connectors could result in headlight failure and unnecessary additional repairs.
After Removal: Inspection, Cleaning, And Replacement Tips
The complexity of modern vehicles like the 2006 GTO necessitates meticulous attention to post-headlight assembly removal. Insightful inspection, thorough cleaning, and careful selection of replacement parts ensure lasting results. Here’s what to focus on after you’ve successfully removed the headlight assembly from your 2006 GTO.
Inspecting The Headlight Assembly And Components
After removing the headlight, take time to inspect each component diligently. Look for signs of damage like cracks or moisture which could indicate a seal failure. Bulb condition is paramount – a dim or flickering light might need a replacement.
| Component | Check for |
|---|---|
| Lens | Cracks, clarity, scratches |
| Housing | Cracks, signs of melting or warping |
| Bulbs | Discoloration, dimness, effectiveness |
| Wiring | Corrosion, fraying, secure connections |
| Seals | Moisture, proper fit, wear and tear |
Cleaning The Headlight Area
With the assembly off, cleaning the exposed areas prevents dirt buildup which could affect the new headlight’s performance. Gently wipe the area using a microfiber cloth and an appropriate cleanser. Avoid harsh chemicals that could damage the paint or electrical components.
- Remove debris and dust with a soft brush or compressed air.
- Use a plastic-safe cleaner for the lens and surrounding area.
- Polish the lens for optimal light output and aesthetic appeal.
Choosing The Right Replacement Parts
Choosing quality replacement parts is crucial for a flawless fix. Always opt for OEM or respected aftermarket brands. They ensure compatibility and reliability.
- Verify the part numbers to match your specific GTO model.
- Assess the warranty of aftermarket parts for peace of mind.
- Consider upgrading to higher-performance bulbs for improved visibility.
Frequently Asked Questions On 2006 Gto Headlight Assembly Removal
How Do You Remove A Whole Headlight Assembly?
To remove a whole headlight assembly, first open the hood. Disconnect the car battery and lights. Remove any screws or clips holding the assembly. Slide out the headlight assembly gently. If necessary, consult your vehicle’s manual for specific instructions.
How To Install Headlights Gto?
Open the hood and locate the headlight assembly. Remove the old headlight by unscrewing the retainer and disconnecting the wiring. Insert the new headlight, connect the wiring, and secure it with the retainer. Ensure everything is tight and close the hood.
What Tools Do I Need To Remove A Headlight Assembly?
To remove a headlight assembly, you’ll need a screwdriver, a ratchet with sockets, and possibly a trim removal tool. Always consult your vehicle’s manual for specific requirements.
How Do You Remove The Headlight Assembly On A Pontiac G6?
Begin by opening the Pontiac G6’s hood. Locate and remove the headlight assembly mounting screws. Disconnect the electrical connector. Carefully slide out the headlight assembly.
Conclusion
Removal of the 2006 GTO headlight assembly can be a straightforward task with the right tools and instructions. By following the step-by-step guide provided, you can confidently tackle this maintenance job. Always ensure safety and proper disposal of any replaced components.
For further modifications or troubleshooting, consult with a professional to maintain your GTO’s stunning appearance and roadworthiness.


