

When it comes to the best headlight repair kits, some top choices include the Cerakote Ceramic Headlight Restoration Kit, Meguiar’s Two Step Headlight Restoration Kit, and Mothers NuLens Headlight Renewal Kit. These kits typically come with sandpaper, compound, and clear coat to help sand off damaged lens coatings and reapply a protective layer, making them a practical and effective DIY solution for restoring headlights.
Other popular options mentioned include the Sylvania Headlight Restoration Kit, Turtle Wax Headlight Lens Restorer, and Griot’s Garage Ceramic Restoration. Toothpaste, baking soda, and polishing compounds like Rain-X can also be effective alternatives for restoring headlights. Bright Solutions is a professional-grade headlight restoration kit that is commonly used to close and seal headlamps, preserving their new look for years.
Why Headlight Repair Kits Are Essential For Your Car
When it comes to the best headlight repair kits, our top picks include the Cerakote Ceramic Headlight Restoration Kit, Meguiar’s Two Step Headlight Restoration Kit, and Mothers NuLens Headlight Renewal Kit. These kits are designed to restore the clarity and brightness of your car’s headlights, providing enhanced visibility and safety on the road.
Don’t miss out on these essential tools for maintaining your car’s headlights.
Increase Visibility And Safety On The Road
When it comes to ensuring your safety on the road, having clear and bright headlights is crucial. Over time, headlights can become hazy, scratched, or discolored, greatly reducing their effectiveness. This is where headlight repair kits come in. These kits are specifically designed to restore the clarity of your headlights, improving visibility and making it easier for you to see the road ahead. By eliminating the haziness and restoring the original brightness of your headlights, these kits provide you with a clear view of the road, especially during nighttime or low-light conditions.
Extend The Lifespan Of Your Headlights
Your car’s headlights are exposed to various elements such as sunlight, rain, dirt, and debris, which can cause damage and deterioration over time. A headlight repair kit can help extend the lifespan of your headlights by repairing minor damages and protecting them from further deterioration. These kits usually come with a combination of cleaning solution, sandpaper, and a protective coating. By using these components, you can remove the oxidized layer, scratches, and other imperfections on your headlights, preventing them from getting worse and ensuring that they stay in good condition for longer.
Avoid Expensive Replacements
Headlight replacements can be expensive, especially if you have to replace both headlights. With a headlight repair kit, you can avoid the need for costly replacements. These kits are a cost-effective solution to refurbishing your headlights, saving you money in the long run. By restoring the clarity and functionality of your existing headlights, you won’t have to invest in new ones unnecessarily. Additionally, these kits are designed to be easy to use, allowing you to perform the repair yourself without the need for professional assistance or expensive labor costs. It’s a practical and budget-friendly way to keep your headlights in top-notch condition without breaking the bank.
Credit: www.autoguide.com
Factors To Consider When Choosing A Headlight Repair Kit
When choosing the best headlight repair kit, it’s important to consider factors such as the included tools and materials, ease of use, and overall effectiveness. Look for top-rated options like the Cerakote Ceramic Headlight Restoration Kit or Meguiar’s Two Step Headlight Restoration Kit for optimal results.
When it comes to choosing a headlight repair kit, there are several key factors you should consider. In order to make the best choice for your vehicle, it’s important to take into account the following:
Compatibility With Your Car’s Headlights
One of the most important factors to consider when choosing a headlight repair kit is its compatibility with your car’s headlights. Different headlights may require different repair methods or materials, so it’s crucial to find a kit that is specifically designed for your vehicle. Ensure that the kit is suitable for your headlight type, whether it’s made of glass, plastic, or coated with a protective layer.
Ease Of Use And Application
The ease of use and application of a headlight repair kit is another important consideration. Look for a kit that comes with clear instructions and all the necessary tools and materials. It should be user-friendly and require minimal effort to achieve desired results. A kit that includes step-by-step guidance and easy-to-follow instructions will save you time and frustration during the repair process.
Long-lasting Results
When investing in a headlight repair kit, it’s important to consider the longevity of the results. Look for a kit that not only restores the clarity of your headlights but also provides long-lasting protection. The best kits will have a durable coating or sealant that helps prevent future discoloration or damage from UV rays and other environmental factors. This will ensure that your headlights stay clear and bright for an extended period of time.
Value For Money
Lastly, it’s essential to consider the value for money when choosing a headlight repair kit. Compare the prices of different kits and evaluate the overall quality and effectiveness of the products included. While it’s tempting to opt for the cheapest option, keep in mind that investing in a high-quality kit will likely deliver better results and save you money in the long run.
By considering the compatibility, ease of use, long-lasting results, and value for money of a headlight repair kit, you’ll be able to choose the best one for your vehicle. Remember, a quality repair kit will not only restore the appearance of your headlights but also improve your safety on the road.
Our Top Picks For The Best Headlight Repair Kits
Discover our top picks for the best headlight repair kits, including the Cerakote Ceramic Headlight Restoration Kit, Meguiar’s Two Step Headlight Restoration Kit, and Mothers NuLens Headlight Renewal Kit. Restore your headlights and improve visibility for safer nighttime driving.
Cerakote Ceramic Headlight Restoration Kit
The Cerakote Ceramic Headlight Restoration Kit is a top pick for its advanced ceramic technology that restores yellowed and oxidized headlights to their original clarity. This kit includes everything you need, from sanding pads to a ceramic coating, ensuring a professional-quality result. With easy-to-follow instructions, this kit is suitable for both DIY enthusiasts and professional detailers.
Meguiar’s Two Step Headlight Restoration Kit
Meguiar’s Two Step Headlight Restoration Kit is another excellent choice for bringing back the clarity of your headlights. This kit includes a unique two-step process that effectively removes oxidation and restores optical clarity to your headlights. The kit comes with specialized sanding pads, a polishing compound, and a coating to protect against future damage.
Mothers Nulens Headlight Renewal Kit
The Mothers NuLens Headlight Renewal Kit is designed to restore yellowed and hazy headlights. It features a three-step process that includes sanding, polishing, and sealing. The kit contains all the necessary components, including a PowerBall polishing tool, to make the restoration process fast and easy. With this kit, you can achieve professional-level results in the comfort of your own garage.
Sylvania Headlight Restoration Kit
The Sylvania Headlight Restoration Kit is a popular choice among car enthusiasts. This kit includes step-by-step instructions and all the essential tools to restore yellowed and foggy headlights. With no extra tools required, the Sylvania kit is perfect for beginners. The end result is headlights that look like new, with improved clarity and visibility.
Turtle Wax Headlight Lens Restorer
Turtle Wax Headlight Lens Restorer is an affordable and effective kit for restoring cloudy headlights. It features an easy-to-use formula that removes oxidation and restores optical clarity. The kit includes a lens clarifying compound, spray lubricant, and lens sealing wipe. With Turtle Wax, you can achieve impressive results without breaking the bank.
How Headlight Restoration Kits Work
Headlight restoration kits are a convenient solution for fixing foggy and oxidized headlights. They typically include sandpaper, compound, and a clear coat to remove damaged coating and provide a protective layer. Some popular options include Cerakote Ceramic Headlight Restoration Kit, Meguiar’s Two Step Headlight Restoration Kit, and Mothers NuLens Headlight Renewal Kit.
Removing Oxidation And Yellowing
Headlight restoration kits are designed to effectively remove oxidation and yellowing from your headlights. Over time, environmental factors such as UV rays, dirt, and pollution can cause the clear coating on your headlights to deteriorate, leading to a cloudy and faded appearance.
These kits typically include sandpaper with varying grits, ranging from coarse to fine, to gently remove the damaged outer layer of the headlight lens. By carefully sanding the surface in a controlled manner, you can eliminate the built-up oxidation and yellowing, restoring clarity to your headlights.
Smoothing Out Scratches And Imperfections
In addition to removing oxidation and yellowing, headlight restoration kits also help in smoothing out scratches and imperfections on the lens. The sandpaper included in the kit, along with the abrasive compounds, work together to buff out any surface scratches, creating a smoother and clearer lens.
By following the instructions provided with the kit, you can gradually work your way through the different sandpaper grits to gradually refine the surface of the headlight lens. This process helps to eliminate any visible scratches or imperfections, further enhancing the overall appearance of the headlights.
Applying A Protective Sealant
Once the oxidation, yellowing, and scratches have been addressed, headlight restoration kits typically include a protective sealant. This sealant serves as a barrier against future damage, prolonging the clarity and appearance of your headlights.
The sealant is usually applied using a foam applicator or microfiber cloth, ensuring an even and thorough coverage. This protective layer helps to prevent the reoccurrence of oxidation and yellowing, as well as protecting the lens from UV rays, dirt, and other environmental factors.
Conclusion
Headlight restoration kits provide an effective and affordable solution to rejuvenate and restore your headlights. By following the step-by-step instructions provided in the kit, you can easily remove oxidation, smooth out scratches, and apply a protective sealant, restoring clarity and enhancing the visibility of your headlights.
Step-by-step Guide To Restoring Your Car’s Headlights With A Repair Kit
Discover the best headlight repair kits for restoring your car’s headlights with a step-by-step guide. From the Cerakote Ceramic Headlight Restoration Kit to the Meguiar’s Two Step Headlight Restoration Kit, find the perfect solution to bring back clarity and brightness to your headlights.
Restoring your car’s headlights can greatly improve visibility and enhance the overall appearance of your vehicle. With a good headlight repair kit and some elbow grease, you can restore your headlights to their former glory. In this step-by-step guide, we will walk you through the process of restoring your car’s headlights using a repair kit.
Preparing The Headlights
Before you begin the restoration process, it’s important to properly prepare your headlights. Follow these steps to ensure the best results:
- Start by cleaning the surface of the headlights using a mild soap and water. This will remove any dirt, grime, or debris.
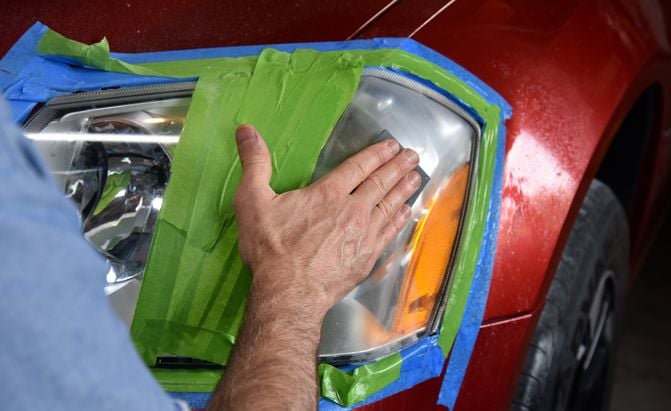
- After cleaning, use a masking tape to protect the surrounding areas of the headlights, such as the paint and the surrounding bumper.
- Next, use a plastic headlight cleaner or a fine-grit sandpaper to gently sand the surface of the headlights. This will help remove any oxidation or yellowing.
- After sanding, rinse the headlights with water to remove any residue.
Sanding And Buffing The Surface
Once you have prepared the headlights, it’s time to sand and buff the surface to restore clarity and remove imperfections. Follow these steps:
- Attach the sandpaper included in the repair kit to a sanding block or use an electric drill with a sanding attachment.
- Start sanding the headlights in a back-and-forth motion, applying light pressure. Be sure to cover the entire surface of the headlights.
- Continue sanding with progressively finer grit sandpapers, starting with a coarser grit and gradually moving to a finer grit.
- After sanding, use a clean microfiber cloth to wipe away any residue and inspect the headlights for any remaining imperfections.
- If needed, repeat the sanding process until the headlights are smooth and free of any haze or scratches.
Applying The Restoration Compound
After sanding and buffing, it’s time to apply the restoration compound to further enhance the clarity and brightness of your headlights. Follow these steps:
- Apply a small amount of restoration compound to a clean microfiber cloth.
- Gently rub the compound onto the headlights using circular motions. Be sure to cover the entire surface.
- Continue rubbing the compound for a few minutes to allow it to work its magic.
- After applying the compound, use a clean microfiber cloth to wipe away any excess residue.
Sealing The Headlights With A Protective Coat
Once you have applied the restoration compound, it’s important to seal the headlights with a protective coat to maintain the restored clarity and protect against future damage. Follow these steps:
- Apply a thin layer of the protective coating included in the repair kit to a clean microfiber cloth.
- Gently wipe the coating onto the headlights using a back-and-forth motion, ensuring complete coverage.
- Allow the protective coat to dry according to the instructions provided.
- Once dry, use a clean microfiber cloth to buff the headlights and remove any excess residue.
And there you have it! By following this step-by-step guide, you can successfully restore your car’s headlights using a repair kit. Not only will this improve visibility and safety while driving, but it will also give your vehicle a fresh and polished look. So why wait? Grab a headlight repair kit and get started on restoring your headlights today!
Tips And Tricks For Successful Headlight Restoration
Restoring your headlights can make a world of difference in improving visibility while driving at night and enhancing the overall appearance of your vehicle. To ensure a successful headlight restoration, there are a few tips and tricks that you should keep in mind.
Working In A Well-ventilated Area
Before you start the headlight restoration process, it is essential to work in a well-ventilated area. This will help to minimize the inhalation of any toxic fumes from the restoration products. Additionally, proper ventilation will prevent the buildup of dust particles on the headlights, ensuring a cleaner finish.
Using The Right Sandpaper Grit For Your Headlights
Choosing the correct sandpaper grit is crucial for achieving a smooth and even result during headlight restoration. For the initial sanding, start with a low grit sandpaper, such as 800 or 1000, to remove the oxidized layer and any deep scratches. Gradually move to higher grit sandpaper, like 2000 or 3000, for a finer finish.
Tip: Wet sanding using water or a lubricant can help prevent the sandpaper from clogging and provide a smoother surface.
Taking Your Time With Each Step
Headlight restoration requires patience and attention to detail. Take your time with each step to ensure a thorough and effective restoration. Rushing through the process may result in an uneven finish or missed areas. Remember, a little extra time and effort can make a significant difference in the final outcome.
Following The Instructions Carefully
Each headlight restoration kit comes with its own set of instructions. It is crucial to read and follow them carefully to achieve optimal results. Different kits may have varying application methods, curing times, and additional steps. Following the instructions ensures that you are using the products correctly and maximizing their effectiveness.
Tip: If the instructions recommend multiple coats of clear coat or any other product, allow each layer to dry completely before applying the next. This will prevent smudging or bubbling.
By following these tips and tricks, you can achieve a successful headlight restoration that will not only improve visibility and safety but also enhance the overall aesthetic appeal of your vehicle.
Frequently Asked Questions For Best Headlight Repair Kits
Who Makes The Best Headlight Restorer Kit?
The best headlight restorer kits are: Cerakote Ceramic Headlight Restoration Kit, Meguiar’s Two Step Headlight Restoration Kit, and Mothers NuLens Headlight Renewal Kit. These kits usually include sandpaper, compound, and clear coat for easy restoration. They are DIY projects that can be done in your own garage or driveway.
Do Headlight Restoration Kits Actually Work?
Yes, headlight restoration kits actually work. They help remove the damaged lens coating and reapply a protective layer. These kits require some effort, including sanding and using a clear coat. They can be done as a DIY project in your garage or driveway, and some may require an electric drill.
Overall, the restoration kits are effective in improving headlight visibility.
What Is The Best Thing To Restore Headlights?
The best thing to restore headlights is to use a headlight restoration kit. These kits typically include sandpaper, compound, and clear coat to remove damage and apply a protective layer. Toothpaste, baking soda, or polishing compounds like Rain-X can also be effective cleaners.
Professional services may use commercial-grade kits for long-lasting results.
What Do Professionals Use To Restore Headlights?
Professionals use commercial headlight restoration kits like Bright Solutions. These kits include all the products needed to restore and seal headlights for a long-lasting, like-new appearance. They are easy to use and come in a reusable toolbox. Other popular options include Rain-X and Meguiar’s kits.
Conclusion
To restore your car’s headlights to their former glory, consider investing in one of the best headlight repair kits available. Our top picks include the Cerakote Ceramic Headlight Restoration Kit, the Meguiar’s Two Step Headlight Restoration Kit, and the Mothers NuLens Headlight Renewal Kit.
These kits come equipped with everything you need, from sandpaper and compound to clear coat, making them a comprehensive solution for headlight restoration. With a bit of effort and elbow grease, you can achieve professional-like results in your own garage or driveway.
Don’t let dull and hazy headlights compromise your safety and the overall appearance of your vehicle. Choose one of these top-rated headlight repair kits and enjoy the benefits of clear, bright headlights once again.
