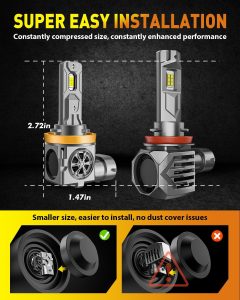
Upgrading your vehicle’s headlights can seem daunting, but with the CanBus-ready Torchbeam H11 LED bulb, installation becomes a breeze. This guide walks you through a 5-minute step-by-step installation, ensuring that even those with minimal technical knowledge can upgrade their headlights effortlessly. Let’s dive in and get your vehicle’s lighting upgraded with no stress!
What is the Torchbeam H11 CanBus Ready?
The Torchbeam H11 is a CanBus-ready LED headlight bulb designed to work seamlessly with modern vehicles. CanBus technology, or Controller Area Network Bus, ensures that the LED bulb communicates smoothly with your vehicle’s computer system. This reduces errors or “bulb-out” warnings that can happen with non-CanBus-compatible LEDs. Torchbeam H11 LEDs are not only reliable but also deliver a powerful, crisp light, enhancing both the look and safety of your vehicle.
Why Choose CanBus Ready for Your Vehicle Lighting?

CanBus-ready LEDs, like the Torchbeam H11, are perfect for most vehicles that use complex computer systems for monitoring headlights and other functions. Without CanBus compatibility, some LEDs may not communicate correctly with these systems, causing dashboard error messages or headlight flickering. Choosing a CanBus-ready bulb eliminates these issues and ensures you get smooth, bright illumination without electronic interference.
Tools You’ll Need for Installation
One of the best parts about upgrading to the Torchbeam H11 is the straightforward installation that requires very few tools:
- A pair of gloves (recommended for handling the bulb)
- Basic cleaning supplies if needed to remove any dust from the headlight area
Since the Torchbeam H11 is plug-and-play, you’re unlikely to need any additional tools. It’s as simple as removing the old bulb and inserting the new one!
Safety Precautions Before Starting
Before you begin, here are some quick safety tips:
- Turn off your vehicle and allow the headlight area to cool if it’s recently been in use.
- Wear gloves to prevent oils from your skin from touching the LED bulb, as this can reduce the lifespan of the bulb.
- Make sure you have a clean, stable workspace and a soft cloth nearby to clean your hands or the bulb if necessary.
Step-By-Step 5-Minute Installation Guide
Step 1: Preparing Your Car for Installation
Pop open your vehicle’s hood and locate the headlight housing. Most vehicles will have a clear plastic cover over the headlights that’s easily accessible.
Step 2: Locating the Headlight Housing
The headlight housing for an H11 bulb will usually be on the inside edge of each headlight. Once you find it, double-check your vehicle manual if you’re uncertain.
Step 3: Removing the Old H11 Bulb
Turn the existing H11 bulb counterclockwise to loosen it. Gently pull it out, ensuring you don’t touch any reflective surfaces or the bulb itself.
Step 4: Installing the Torchbeam H11 CanBus Bulb
Align the new Torchbeam H11 bulb and insert it into the housing. Twist it clockwise until you feel it secure. The CanBus-ready feature means you don’t need to add extra adapters or wiring.
Step 5: Testing the New Bulb
Once installed, turn on your headlights to make sure the bulb lights up and operates smoothly. Look for any flickering or error messages; if none, your installation is complete!
Common Issues and Quick Fixes During Installation
- Flickering Bulb: Double-check the bulb’s connection. Sometimes a loose fit can cause flickering.
- Dashboard Error Message: This is unlikely with the CanBus-ready Torchbeam H11, but if it occurs, unplug the bulb and reconnect it securely.
How Can You Tell if the Installation is Successful?
A smooth installation means no flickering or error warnings, and the bulb should light up immediately when you turn on your headlights. Look for bright, even illumination across your path.
Adjusting Your Headlight Beam After Installation
To avoid blinding oncoming drivers or reducing visibility, ensure your headlights are properly aligned. Adjust the beam height if necessary by following your vehicle manual’s recommendations or using the adjustment screws usually located behind the headlight assembly.
Benefits of Upgrading to LED Headlights
LED bulbs like the Torchbeam H11 offer a higher brightness level, increased lifespan, and reduced energy consumption compared to halogen bulbs. Their brightness enhances visibility at night, and LEDs generally have a lifespan of up to 50,000 hours, meaning fewer replacements and a more eco-friendly lighting choice.
Maintenance Tips for LED Bulbs
To keep your Torchbeam H11 LED bulb functioning optimally:
- Avoid touching the bulb with bare hands to keep oils from transferring.
- Inspect periodically for any dust or moisture that may accumulate on the housing.
- Clean the headlight cover regularly to ensure the best light output.
Frequently Asked Questions About Torchbeam H11 Installation
- Q: Do I need any extra adapters for the Torchbeam H11?
- A: No, the Torchbeam H11 is CanBus-ready and doesn’t require additional adapters.
- Q: Can I install it myself, or do I need a mechanic?
- A: This guide makes it easy for you to install the bulb yourself in minutes.
- Q: Will the Torchbeam H11 work with all vehicles?
- A: It’s compatible with most, but it’s always best to check your vehicle’s manual or consult with the manufacturer.
- Q: What should I do if the bulb doesn’t light up?
- A: Check the connection and try reinstalling. If issues persist, consult Torchbeam customer support.
- Q: Is there a risk of overheating with LED bulbs?
- A: LED bulbs run cooler than halogens, reducing the risk of overheating.
Troubleshooting Tips for CanBus System Issues
In the rare case of a CanBus compatibility issue:
- Reset the vehicle’s headlight system by turning it off and on.
- Check for updates with Torchbeam or your vehicle’s manufacturer to ensure maximum compatibility.
Comparing Torchbeam H11 with Other LED Bulbs
Torchbeam H11 LED bulbs stand out for their high brightness, durability, and CanBus-ready design, which reduces compatibility issues. Compared to other LED bulbs, they offer plug-and-play ease, excellent performance, and reliability for modern vehicle systems.
Conclusion
The Torchbeam H11 CanBus Ready LED bulb brings a blend of quality, brightness, and ease of installation that makes it an ideal choice for upgrading your headlights. With just five minutes, you can transform your nighttime visibility and enhance safety without needing advanced tools or experience.
FAQs
- Can I install the Torchbeam H11 in rainy conditions?
- It’s best to install in dry conditions to avoid moisture affecting the bulb or connections.
- Does the Torchbeam H11 need a ballast?
- No, this LED is CanBus-ready and doesn’t require a ballast.
- How long does the Torchbeam H11 LED last?
- It has a lifespan of up to 50,000 hours, depending on use.
- Is it safe to install without disconnecting the battery?
- For extra safety, disconnect the battery, though it’s generally not required.
- Will this upgrade affect my car’s warranty?
- Typically, no, but check with your manufacturer if you have concerns.


