
Clean Xenon headlights in a few simple steps. Use a cleaning solution of baking soda and vinegar to remove cloudy film and dirt from the lens and projector mirror surface.
This DIY option is effective for oxidized or very cloudy headlights.
Understanding Xenon Headlights
Xenon headlights, also known as high-intensity discharge (HID) headlights, have gained popularity in the automotive industry due to their superior performance and aesthetics. Unlike traditional halogen headlights, xenon headlights produce a brighter and whiter light, providing drivers with enhanced visibility on the road.
What Are Xenon Headlights?
Xenon headlights are a type of headlight system that uses xenon gas to produce light. The xenon gas, when ignited by an electric charge, emits a bright and intense beam of light. This results in headlights that are significantly brighter and more powerful than halogen headlights, making them a popular choice among car enthusiasts and safety-conscious drivers.
Benefits Of Xenon Headlights
There are several benefits of using xenon headlights:
- Enhanced visibility: Xenon headlights produce a more intense and focused beam of light, improving visibility on the road, especially during nighttime driving or in adverse weather conditions.
- Longer lifespan: Xenon headlights have a longer lifespan compared to halogen headlights, reducing the frequency and cost of replacement.
- Energy efficiency: Despite the brighter output, xenon headlights are more energy-efficient than traditional halogen headlights, resulting in lower energy consumption by the vehicle.
- Aesthetically pleasing: The white and crisp light produced by xenon headlights enhances the overall appearance of the vehicle, giving it a modern and stylish look.
Why Do Xenon Headlights Require Cleaning?
While xenon headlights offer numerous advantages, they are still susceptible to getting dirty and losing their brightness over time. Various factors, such as road grime, dust, and UV damage, can accumulate on the surface of the headlights, causing them to become hazy, yellowish, or dull. This buildup not only affects the aesthetic appeal of the vehicle but also diminishes the performance of the headlights, reducing visibility on the road.
Cleaning xenon headlights is essential to maintain their optimal functionality and ensure maximum visibility. Regular cleaning removes dirt, grime, and oxidation, restoring the clarity and brightness of the headlights. It also helps to prolong the lifespan of the xenon bulbs and prevent premature failure.
Next, we will explore the step-by-step process of cleaning xenon headlights to help you keep your headlights in top condition.
Checking For Headlight Damage
To properly clean xenon headlights and check for any damage, start by opening the hood and removing the headlight cover. Take out the lens from the housing and carefully clean it using a glass cleaning cloth. Reinstall the bulb and test the headlights before closing the hood.
Proper maintenance like this will ensure clear and functional headlights for safe driving.
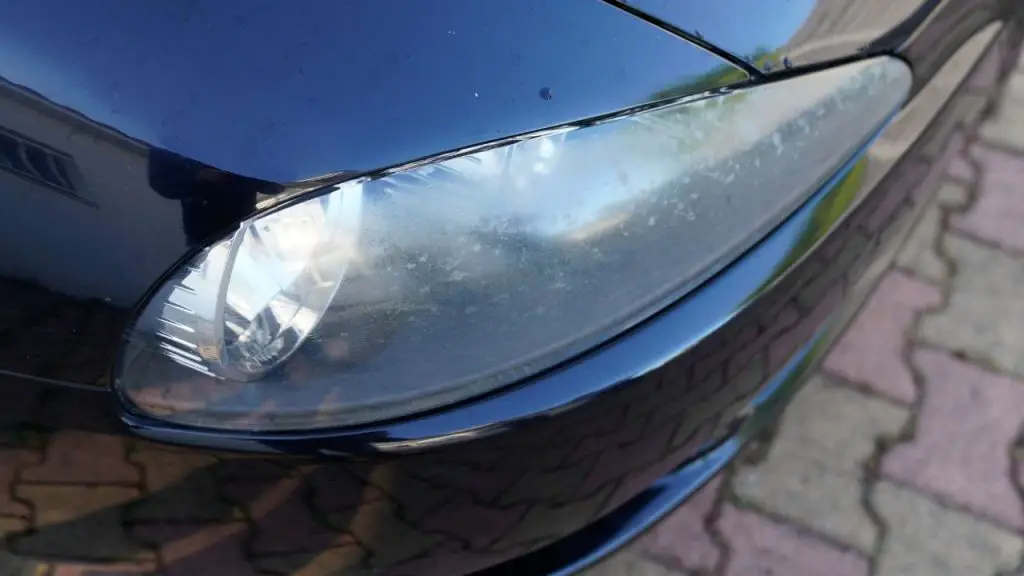
Signs Of Dirty Or Cloudy Headlights
When it comes to checking for headlight damage, the first step is to identify any signs of dirty or cloudy headlights. Dirty headlights not only diminish the brightness of your xenon headlights but also reduce visibility, posing a potential safety hazard. Signs of dirty or cloudy headlights can include:
- Dull or hazy appearance
- Yellowing or discoloration
- Reduced light output
- Visibility issues at night or during bad weather
Identifying Scratched Or Damaged Xenon Headlights
In addition to dirt or cloudiness, it’s important to inspect xenon headlights for scratches or other damage. Scratched or damaged headlights can further detract from the effectiveness of your headlights and may require professional intervention. Some indicators of scratched or damaged xenon headlights include:
- Visible scratches or cracks on the lens
- Chips or dents on the housing
- Water or condensation inside the headlight assembly
- Uneven light distribution or beams
If you notice any of these signs, it’s crucial to address the issue promptly to ensure optimal visibility and safety on the road.
Importance Of Regular Maintenance
Regular maintenance of your xenon headlights is essential to keep them in top shape and prevent potential damage. By incorporating a few simple cleaning and maintenance practices, you can prolong the lifespan of your headlights and ensure maximum visibility. Some key reasons for regular maintenance include:
- Improved visibility during nighttime driving
- Enhanced safety on the road
- Preservation of the headlight’s efficiency and performance
- Prevention of expensive repairs or replacements
By regularly checking for signs of dirt, cloudiness, scratches, or other damage, you can take the necessary steps to clean or repair your xenon headlights and maintain their optimal condition.
Preparing For The Cleaning Process
To prepare for the cleaning process of Xenon headlights, start by opening the hood and removing the headlight cover. Then, carefully remove the lens from the housing and clean it using a glass cleaning cloth. Finally, re-install the bulb and test the headlights for optimal visibility.
Gathering The Necessary Supplies And Tools
Before diving into the cleaning process, it’s essential to gather all the necessary supplies and tools. Having everything prepared will ensure a smooth and efficient cleaning experience.
Here are the supplies and tools you will need:
- Microfiber cloth: A high-quality microfiber cloth will be your best friend during the cleaning process. It is gentle on the headlights and helps to eliminate any smudges or dirt without scratching the surface.
- Headlight cleaning solution: There are several headlight cleaning solutions available in the market. Choose a solution that is compatible with Xenon headlights and is designed to remove oxidation and yellowing.
- Water: You will need water for rinsing and diluting the cleaning solution as per the instructions.
- Plastic cleaner and polish: These products are specifically formulated to restore clarity to plastic surfaces and can be used to polish the headlights after cleaning.
- Masking tape: Masking tape will help protect the surrounding areas of the headlights from any accidental scratches or damage during the cleaning process.
- Screwdriver or wrench: Depending on the make and model of your vehicle, you may need a screwdriver or wrench to remove the headlight cover.
Understanding Safety Precautions
Safety should always be a top priority when working with car headlights. Here are some safety precautions you should take:
- Wear protective gloves and eyewear: Cleaning solutions and debris can be harmful to your skin and eyes. Always wear protective gloves and eyewear to prevent any accidents.
- Work in a well-ventilated area: Some cleaning solutions may have strong fumes. It’s important to work in a well-ventilated area or outdoors to avoid inhaling any harmful chemicals.
- Disconnect your car’s battery: To prevent any electrical mishaps, disconnect your car’s battery before starting the cleaning process. This will ensure your safety and protect your vehicle’s electrical system.
Removing The Headlight Cover
Before you can clean the Xenon headlights, you need to remove the headlight cover. Here’s how:
- Locate the screws or clips: Depending on your vehicle, the headlight cover may be held in place by screws or clips. Use a screwdriver or wrench to carefully remove them.
- Gently lift the headlight cover: After removing the screws or clips, gently lift the headlight cover to expose the Xenon headlights.
- Set aside the headlight cover: Place the headlight cover in a safe location where it won’t get damaged or scratched.
Cleaning The External Lens
Looking to clean your xenon headlights? Follow these steps for a crystal clear lens: open the hood, remove the headlight cover, take out the lens from the housing, clean the lenses, and re-install the bulb. Enjoy improved visibility and a sleek appearance!
Removing Dirt And Grime From The Lens Surface
Over time, the external lens of your xenon headlights can become dirty and dull, reducing the effectiveness of the light and compromising your visibility on the road. To ensure optimal performance and safety, it is important to regularly clean the lens surface.
Before starting the cleaning process, make sure the headlights are turned off and cool to the touch. Begin by removing any loose dirt and debris from the lens using a soft, dry cloth. Gently wipe the surface, being careful not to scratch the lens.
If there are stubborn stains or grime, you can use a non-abrasive cleaner specifically designed for automotive surfaces. Avoid using harsh chemicals or abrasive materials, as these can damage the lens. Instead, opt for a mild soap solution.
Using A Mild Soap Solution For Cleaning
To create a mild soap solution, mix a small amount of automotive soap or dishwashing detergent with warm water. Wet a clean sponge or cloth with the solution and gently scrub the lens surface in circular motions.
Be sure to thoroughly clean the entire lens surface, including the edges and corners. Rinse the sponge or cloth frequently to avoid spreading dirt or grime. Once you have removed all the dirt and debris, rinse the lens with clean water and dry it thoroughly with a soft, lint-free cloth.
Applying A Specialized Lens Cleaner For A Crystal Clear Shine
For a truly crystal-clear shine, you can further enhance the cleanliness of your xenon headlights by applying a specialized lens cleaner. These cleaners are designed specifically for automotive lenses and can remove any remaining haze or residue.
Apply the lens cleaner to a clean, dry cloth and gently buff the lens surface in circular motions. Be sure to follow the manufacturer’s instructions and use the cleaner sparingly. Excess cleaner can leave streaks or residue on the lens.
After buffing the lens with the specialized cleaner, use a separate clean, dry cloth to remove any excess product and polish the surface to a high shine.
By regularly cleaning the external lens of your xenon headlights, you can ensure optimal performance and safety on the road. Removing dirt and grime, using a mild soap solution, and applying a specialized lens cleaner will result in crystal-clear headlights, enhancing your visibility and making your vehicle shine.
Cleaning The Internal Projector Lens
Achieve crystal clear vision on the road by cleaning the internal projector lens of your Xenon headlights. Remove the lens, clean it using a glass cleaning cloth, and re-install it for improved headlight performance.
Detailed Instructions For Safely Accessing The Projector Lens
When it comes to cleaning the internal projector lens of your xenon headlights, it is important to follow proper procedures to avoid causing any damage. Here are detailed instructions for safely accessing the projector lens:
- Step 1: Start by opening the hood of your car and locating the headlight assembly.
- Step 2: Remove the headlight cover carefully, ensuring not to break any tabs or clips holding it in place.
- Step 3: Once the cover is removed, you will see the projector lens housed inside.
- Step 4: Get ready to clean the internal lens by preparing a soft cloth and lens cleaner specifically designed for automotive use.
- Step 5: Proceed with caution as you remove the lens from the housing. Be gentle and avoid applying excessive force.
- Step 6: Once the lens is removed, you can move on to cleaning it thoroughly.
Using A Soft Cloth And Lens Cleaner To Clean The Internal Lens
Now that you have safely accessed the internal projector lens, it’s time to clean it using a soft cloth and lens cleaner designed for automotive use. Here’s how:
- Step 1: Take your soft cloth and spray some lens cleaner onto it.
- Step 2: Gently wipe the cloth over the lens, making sure to remove any dust, dirt, or grime.
- Step 3: Repeat this process until the lens is clean and free from any visible contaminants.
- Step 4: Pay close attention to any stubborn stains or residue on the lens, and apply gentle pressure with the cloth to remove them.
- Step 5: Avoid using harsh or abrasive cleaners or materials, as they can scratch or damage the lens surface.
Removing Stubborn Stains Or Residue
If you encounter stubborn stains or residue on the internal projector lens, follow these steps to ensure a thorough cleaning:
- Step 1: Inspect the stains or residue closely to determine their nature.
- Step 2: Apply a small amount of lens cleaner directly onto the affected area.
- Step 3: Gently scrub the area with a soft cloth, using circular motions.
- Step 4: Repeat this process until the stains or residue are completely removed.
- Step 5: Once the lens is clean, ensure there is no excess cleaner left on its surface by wiping it with a dry cloth.
By following these detailed instructions, you can effectively clean the internal projector lens of your xenon headlights, ensuring optimal performance and visibility on the road.
Reassembling And Testing The Headlights
Reassembling and testing the headlights is an essential step in the process of cleaning xenon headlights. By carefully following the proper techniques and procedures, you can ensure that your headlights are functioning at their best and providing optimal visibility on the road.
Step-by-step Guide For Reassembling The Headlight Components
Once you have successfully cleaned the xenon headlights, it’s time to reassemble them and ensure they are working properly. Follow this step-by-step guide to reassemble the headlight components:
Reinstalling The Bulb And Securing The Lens
After cleaning the lenses, you need to reinstall the bulb and secure the lens back onto the housing. Here’s how to do it:
- First, locate the bulb socket and carefully insert the bulb back into it. Make sure it is properly seated and securely connected.
- Next, align the lens with the housing and gently push it back into place. Ensure that it fits snugly and securely.
- Once the lens is in place, use the appropriate screws or clips to secure it firmly. Double-check that it is properly fastened and won’t loosen over time.
- Finally, test the headlight to ensure it is working correctly.
Testing The Headlights For Proper Functioning
Testing the headlights is essential to ensure they are functioning correctly. Here are the steps to follow:
- Start by turning on the headlights. Check if both lights turn on and emit a strong, bright beam.
- Verify that the high beam and low beam functions are working as expected. Switch between the two and observe the changes in brightness.
- Inspect the beam pattern and ensure it is even and properly aligned. Adjust the headlights if necessary.
- Test the turn signal function by activating the blinkers. Ensure that both headlights flash accordingly.
- Finally, check if the headlights are free from any condensation or fogging. If you notice any moisture, you may need to inspect the seals and address the issue.
By following these steps and thoroughly testing the headlights, you can ensure they are reassembled correctly and functioning properly after the cleaning process. This will help improve visibility on the road and enhance your overall driving experience.
Maintaining Clean Xenon Headlights
Maintaining clean Xenon headlights is essential for optimal visibility on the road. Using a solution of baking soda and vinegar, gently clean the foggy or oxidized headlights to restore their crystal-clear shine.
Tips For Preventing Future Dirt And Grime Build-up
Cleaning xenon headlights regularly is essential for maintaining optimal performance and ensuring maximum visibility while driving. However, it’s also important to take preventive measures to minimize dirt and grime build-up in the future.
- Keep your vehicle parked in a covered or shaded area whenever possible to protect the headlights from direct exposure to environmental elements.
- Apply a protective coating or sealant specifically designed for headlights to create a barrier against dirt and contaminants.
- Avoid using harsh cleaning chemicals or abrasive materials that can damage the headlights’ surface.
- Regularly inspect the headlight housing and surrounding areas for any signs of damage or cracks that can allow dirt and moisture to accumulate.
Regular Cleaning Schedule For Optimal Performance
Establishing a regular cleaning schedule is crucial for maintaining the performance and longevity of your xenon headlights. Here’s a recommended cleaning routine:
- Prepare a mild soapy solution using warm water and a gentle automotive detergent.
- Thoroughly rinse the headlights with water to remove any loose debris or dirt particles.
- Gently scrub the headlights’ surface using a soft microfiber cloth or sponge soaked in the soapy solution.
- Rinse the headlights again with clean water to remove any leftover soap residue.
- Dry the headlights using a clean lint-free cloth to prevent water spots.
Recommended Products For Long-lasting Shine
To ensure a long-lasting shine and optimal clarity for your xenon headlights, it’s important to use the right products. Here are some recommended products:
| Product | Description |
|---|---|
| Headlight Cleaning Kit | A comprehensive kit that includes all the necessary tools and solutions for cleaning and restoring your xenon headlights. |
| Microfiber Cloth | An ultra-soft and highly absorbent cloth that is perfect for cleaning delicate surfaces, such as xenon headlights, without causing scratches. |
| Headlight Restoration Sealant | A specialized sealant formulated to protect headlights from UV rays, oxidation, and yellowing, while providing a long-lasting shine. |

Credit: crystalcleanautodetailing.com
Frequently Asked Questions On Cleaning Xenon Headlights
How Do You Remove Cloudy Film From Headlights?
To remove cloudy film from headlights, use a DIY cleaning solution of baking soda and vinegar. Apply the solution to the headlights and scrub gently. Rinse off with water and dry with a towel. This method works best for oxidized or very cloudy headlights.
How Can I Make My Headlights Crystal Clear Again?
To make your headlights crystal clear again, follow these steps: 1. Clean the surface of debris. 2. Towel dry to remove moisture. 3. Apply a headlight restorer. 4. Remove cleanser with a brush. 5. Clean off excess cleanser.
How Do You Permanently Remove Oxidation From Headlights?
To permanently remove oxidation from headlights, sand off the oxidized layer and apply a new UV coating. This will restore the headlights and prevent future oxidation. How to Restore Auto Headlights Permanently – Red Label Abrasives.
Will Magic Eraser Clean Headlights?
Yes, Magic Eraser can clean headlights effectively.
Conclusion
Cleaning xenon headlights is an essential maintenance task to ensure optimal visibility and safety while driving. Using household vinegar, baking soda, and a glass cleaning cloth can effectively remove dirt, grease, and debris from foggy or cloudy headlights. Remember to clean the surface of debris, towel dry, apply headlight restorer, remove cleanser with a brush, and clean off excess cleanser.
For a more permanent solution, sand off the oxidized layer and apply a new UV coating. With these simple steps, you can restore your headlights to crystal-clear brilliance.


