To replace your headlight bulb, first, locate the back of the headlight assembly. Then, unplug the power connector and remove the old bulb.
Headlight bulbs can dim or burn out over time, affecting nighttime visibility. Replacing a headlight bulb is a straightforward task that you can do yourself. It requires basic tools and minimal effort. First, ensure your car is turned off to avoid electrical issues.
Locate the headlight assembly at the front of your vehicle. Remove any covering or casing that protects the bulb. Unplug the power connector from the back of the bulb. Carefully remove the old bulb from its socket. Install the new bulb by reversing these steps. Make sure it is securely in place and test the new bulb before driving.
Credit: www.jdpower.com
Gather Tools And Materials
Before you start replacing your headlight bulb, you need to gather all the necessary tools and materials. This ensures a smooth and efficient process. Having everything ready will save you time and avoid any interruptions.
Essential Tools
To replace your headlight bulb, you will need the following tools:
- Screwdriver (flathead or Phillips, depending on your car)
- Work gloves to protect your hands
- Socket wrench if your car requires it
- Flashlight for better visibility
Having these tools will help you remove and install the new bulb easily.
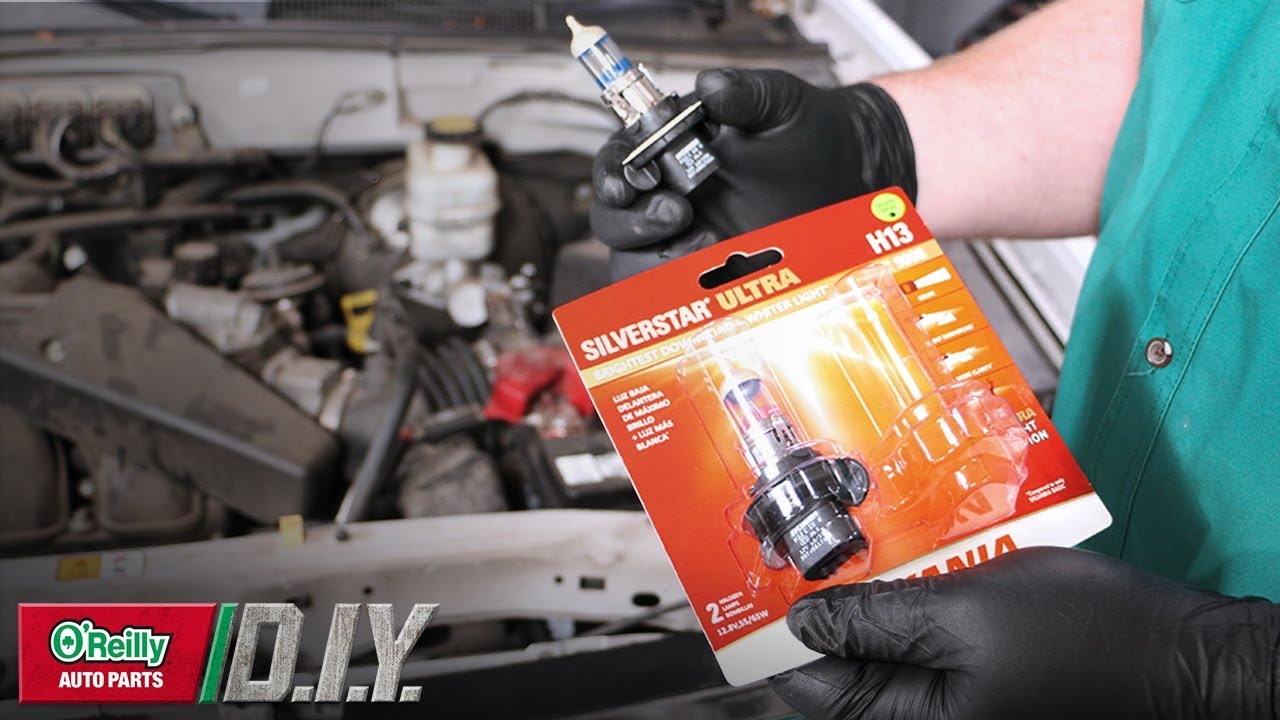
Choosing The Right Bulb
It is crucial to choose the right headlight bulb for your car. Using the wrong bulb can cause issues. Here’s how to choose the correct one:
- Check your car’s manual for bulb specifications.
- Identify the bulb type (halogen, LED, HID).
- Purchase a bulb from a reputable brand.
| Bulb Type | Advantages |
|---|---|
| Halogen | Cost-effective, widely available |
| LED | Bright, energy-efficient, long-lasting |
| HID | Very bright, good for night driving |
Ensure you purchase the right bulb for your car’s make and model.
Safety Precautions
Replacing a headlight bulb may seem simple. Yet, taking safety precautions is crucial. This ensures that you avoid accidents and injuries. Follow these steps carefully to stay safe.
Working With Electrical Components
Always disconnect the car battery first. This prevents any electrical shocks. Wear rubber gloves to avoid direct contact. Check the car manual for specific instructions. This helps you understand the electrical layout.
- Disconnect the battery
- Wear rubber gloves
- Consult the car manual
Avoiding Burns And Injuries
Headlights can get very hot. Wait for the bulb to cool before touching it. Use a clean cloth to handle the bulb. This prevents oil from your fingers from shortening its life.
| Safety Measure | Reason |
|---|---|
| Wait for the bulb to cool | Prevents burns |
| Use a clean cloth | Avoids oil transfer |
Keep tools organized to avoid tripping. Work in a well-lit area to see clearly.
Locate The Headlight Assembly
Replacing a headlight bulb can seem tricky. But it’s straightforward once you know the steps. The first step is to locate the headlight assembly. This guide will help you do just that.
Consult The Owner’s Manual
Your car’s owner’s manual is the best place to start. It provides specific details about your vehicle. Look for the section on headlights. This will tell you exactly where to find the headlight assembly.
Here are some steps to find this information:
- Open the owner’s manual.
- Go to the index section.
- Search for “headlights” or “bulbs”.
- Follow the page number given.
The manual will also offer diagrams. This helps you understand better.
Identifying The Headlight Housing
After consulting the manual, the next step is to identify the headlight housing. The headlight housing is the part that holds the bulb. It is usually located at the front of the car.
Follow these steps to locate it:
- Open the hood of your car.
- Look at the front end of the engine bay.
- Find the back of the headlight assembly.
Here is a simple table to help you:
| Step | Action |
|---|---|
| 1 | Open the car hood. |
| 2 | Locate the engine bay. |
| 3 | Find the headlight housing at the front. |
Identifying the correct part is crucial. Ensure you are looking at the right assembly. The headlight housing will have wires connected to it.
By following these steps, you will easily locate the headlight assembly. This is the first step to replacing your headlight bulb.
Credit: www.youtube.com
Remove The Old Bulb
Replacing a headlight bulb might seem tricky, but it’s quite simple. Follow these steps to safely remove the old bulb.
Accessing The Bulb
First, open the hood of your car. Look for the back of the headlight assembly. You may need to remove a cover or other components to access the bulb.
- Check your car manual for specific instructions.
- Ensure you have clear access to the headlight bulb.
- Keep your workspace well-lit and organized.
Disconnecting The Wiring
Once you can see the bulb, find the wiring connector. This connector attaches the bulb to the car’s electrical system.
- Press the tab on the connector to release it.
- Gently pull the connector away from the bulb.
- Be careful not to force it, as this can damage the wires.
Now, you are ready to remove the old bulb. Twist the bulb counterclockwise to release it from the socket.
| Step | Description |
|---|---|
| 1 | Open the hood and locate the headlight assembly. |
| 2 | Remove any covers to access the bulb. |
| 3 | Find and press the tab on the wiring connector. |
| 4 | Gently pull the connector away from the bulb. |
| 5 | Twist the bulb counterclockwise to remove it. |
With the old bulb removed, you are ready to install the new one. Follow the reverse steps to complete the process.
Install The New Bulb
Replacing your headlight bulb is crucial for safe driving. Let’s break it down into simple steps. Follow these instructions to install the new bulb properly.
Handling The New Bulb
Always handle the new bulb with care. Use gloves to avoid touching the glass. Oils from your skin can damage the bulb. Hold the bulb by its base only.
- Wear gloves for protection.
- Hold the bulb by its base.
- Avoid touching the glass part.
Securing The Bulb In Place
Insert the new bulb into the headlight socket. Ensure it fits snugly. You may need to twist it slightly. Follow these steps:
- Align the bulb with the socket.
- Gently push it in.
- Twist to secure it tightly.
Check if the bulb is firm. A loose bulb can cause issues. Ensure all connections are secure.
Here’s a quick table for better clarity:
| Step | Action |
|---|---|
| 1 | Wear gloves |
| 2 | Hold bulb by base |
| 3 | Insert into socket |
| 4 | Twist to secure |
Once the bulb is in place, reconnect the power. Test your headlights. Make sure they work correctly. This step ensures your safety on the road.

Credit: www.reddit.com
Test The New Headlight
Once you’ve installed the new headlight bulb, it’s crucial to test it. Ensuring that your new headlight works correctly guarantees safety. This step helps you avoid potential issues while driving at night.
Checking Functionality
Start your car and turn on the headlights. Check if the new bulb lights up. Observe both high and low beams to ensure they function properly. Ensure the brightness matches the other headlight. If the new bulb doesn’t light up, recheck the connections. Sometimes, the bulb may not be seated correctly.
Adjusting The Beam
Proper beam alignment is essential for safe driving. Misaligned headlights can blind oncoming traffic. To adjust the beam:
- Park your car on a flat surface facing a wall.
- Turn on the headlights and mark the beam’s center on the wall with tape.
- Back up the car about 25 feet.
- Adjust the headlights so the beam hits just below the tape marks.
Use the adjustment screws on the headlight assembly to fine-tune the beam direction. Ensure both headlights are at the same height and angle.
Final Thoughts
Replacing your headlight bulb is important for safety. It ensures you can see and be seen. Doing it yourself can save time and money. Follow these tips to make it easier and safer.
Common Mistakes To Avoid
- Touching the Bulb: Oils from your hands can damage the bulb. Use gloves or a cloth.
- Wrong Bulb Type: Check your car manual for the correct bulb type. Using the wrong one can cause issues.
- Improper Installation: Make sure the bulb is securely in place. A loose bulb can cause it to flicker or not work.
Maintenance Tips
| Tip | Description |
|---|---|
| Regular Checks | Inspect your headlights every month. Ensure they are working properly. |
| Clean Lenses | Dirt can dim your lights. Clean the lenses for better visibility. |
| Replace in Pairs | If one bulb goes out, the other may soon follow. Replace both to ensure even lighting. |
| Carry Spares | Keep extra bulbs in your car. You will be prepared for emergencies. |
Following these tips can help you maintain your headlights. Safe driving requires good visibility. Make sure your headlights are always in good condition.
Frequently Asked Questions
Can I Replace A Headlight Bulb Myself?
Yes, you can replace a headlight bulb yourself. Follow the car manual for instructions. Ensure the vehicle is off and cool. Use proper safety gear and tools.
Will Autozone Replace A Headlight Bulb?
Yes, AutoZone can help replace a headlight bulb. They offer free installation for most vehicles.
Do I Need To Disconnect The Battery To Change The Headlight Bulb?
No, you don’t need to disconnect the battery to change the headlight bulb. Ensure the vehicle is off for safety.
How Much Does It Cost To Replace A Headlight Bulb?
Replacing a headlight bulb typically costs between $15 and $100. The price varies based on the vehicle type and bulb quality. Labor fees at a mechanic shop might add $50 to $100. DIY replacement can save labor costs. Always consult your vehicle’s manual for the correct bulb type.
Conclusion
Replacing your headlight bulb can be a simple DIY task. Follow the steps carefully and ensure safety first. Always consult your vehicle’s manual for specific instructions. Proper maintenance of your headlights ensures better visibility and safety on the road. Don’t hesitate to seek professional help if needed.
Happy driving!