

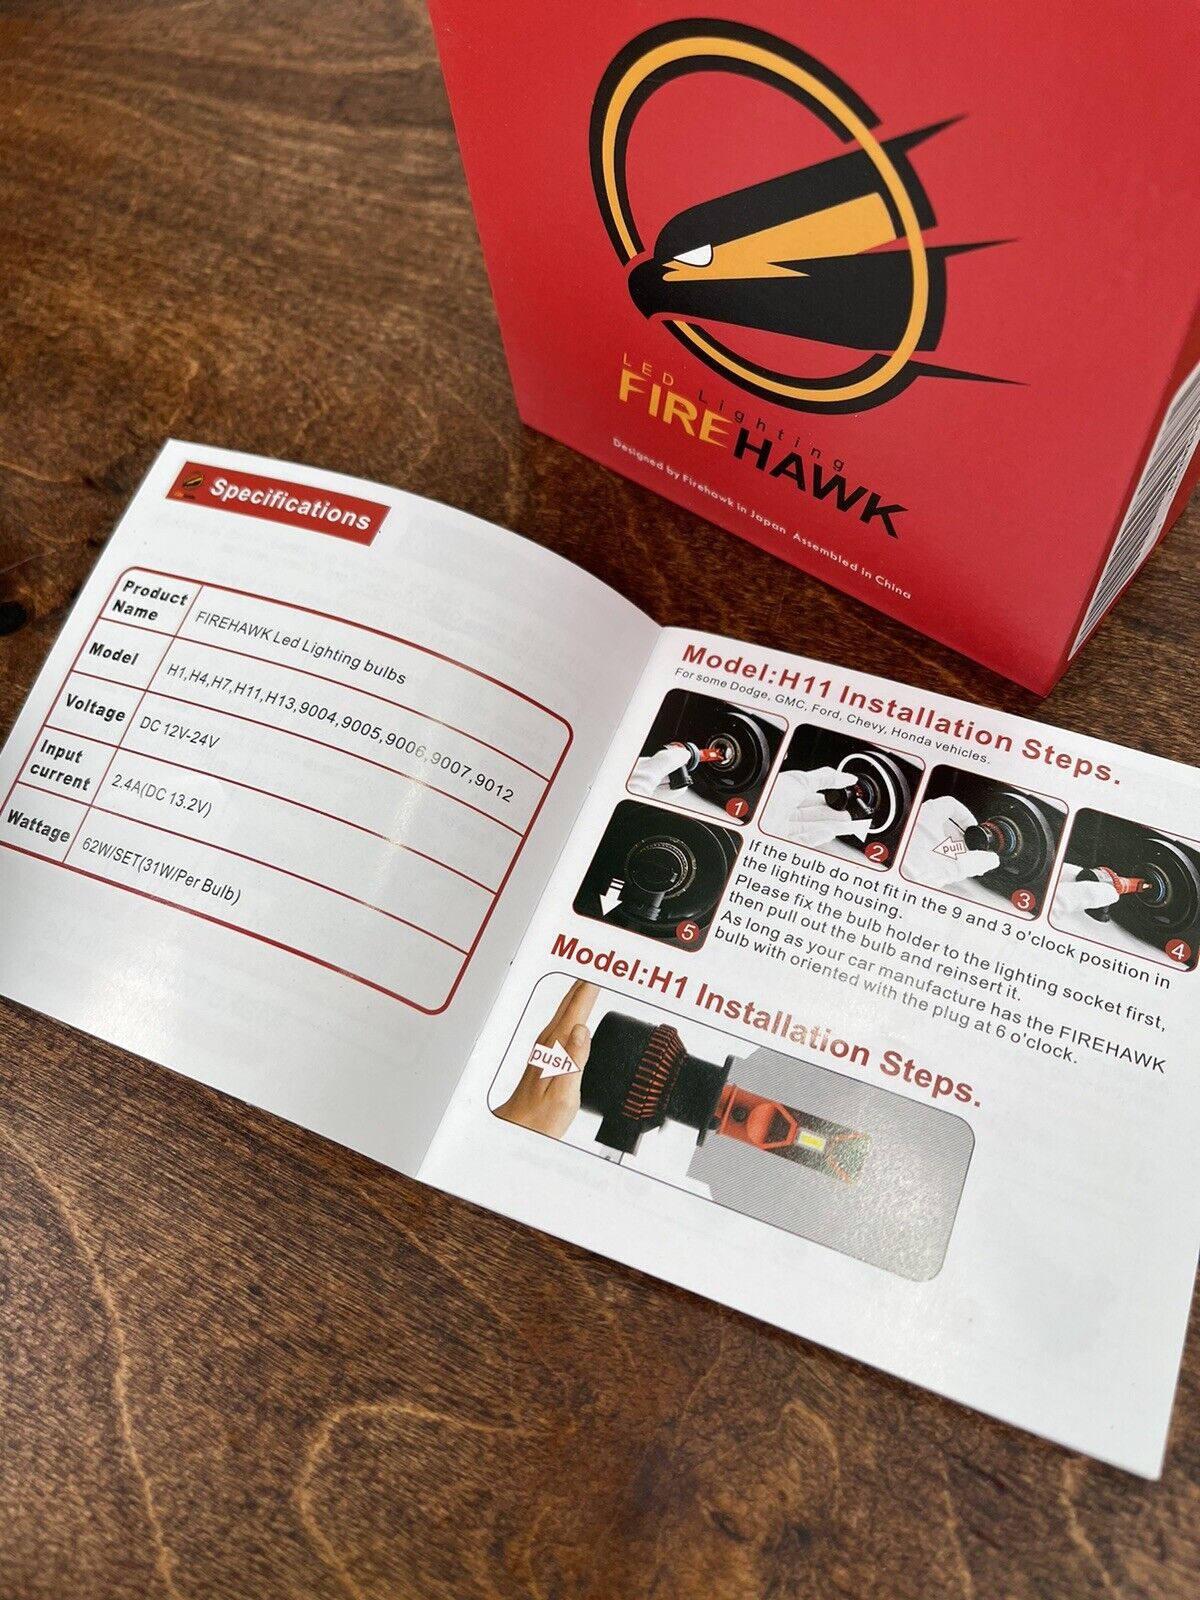
To replace a headlight socket H11, start by pulling out the socket from the connector and replacing it with a new one. Make sure to find the correct type of light bulb for your vehicle before proceeding with the replacement.
Replacing a headlight socket H11 is a simple and straightforward process that can be done with just a few steps. Whether your socket is broken or burned out, replacing it will ensure that your headlight continues to function properly. In this guide, we will provide you with step-by-step instructions on how to replace a headlight socket H11.
By following these instructions, you’ll be able to get your headlight back in working order quickly and efficiently. So let’s get started!
Identifying The Problem
Identifying the Problem:
When it comes to replacing a faulty headlight socket, it’s important to first be able to identify the problem. There are several signs that can indicate a faulty headlight socket:
- Dim headlights or inconsistent brightness
- Flickering headlights
- Burnt smell coming from the socket
- Melting or burning of the socket
- Loose or corroded connections
Understanding the importance of replacing the socket is essential to ensure proper functioning of the headlight system. A faulty socket can lead to reduced visibility on the road, which can be dangerous for both the driver and other vehicles. By replacing the socket, you can restore the brightness and functionality of your headlights.
Tools And Materials Needed
| Tools and Materials Needed |
| List of tools required for the replacement process: |
| 1. Socket wrench |
| 2. Pliers |
| 3. Screwdriver |
| 4. Wire stripper |
| 5. Soldering iron |
| 6. Heat shrink tubing |
| 7. Butt connectors |
| 8. Electrical tape |
| 9. Replacement headlight socket H11 |
| 10. Replacement headlight bulb |
| 11. Wiring diagram for your vehicle (if available) |
| Materials needed for a successful replacement: |
| 1. Replacement headlight assembly (if necessary) |
| 2. Replacement fuse (if necessary) |
| 3. Replacement wire harness (if necessary) |
| 4. Dielectric grease |
Removing The Headlight Assembly
If you need to replace a headlight socket H11, you’ll first need to remove the headlight assembly. Follow this step-by-step guide to safely remove the headlight assembly:
- Start by watching a video tutorial for visual reference.
- Turn the bulb counter/clockwise to remove it.
- Push the tab and pull the connector from the bulb.
- To remove the headlight assembly, follow the specific instructions provided in your vehicle’s manual or watch a detailed video tutorial.
- Once the headlight assembly is removed, you can proceed with replacing the headlight socket H11.
Remember to take necessary safety precautions and refer to manufacturer guidelines throughout the process. Properly installed headlight sockets ensure optimal performance and visibility while driving.
Credit: www.ebay.com
Splicing The Wires
| Heading: Splicing the Wires |
|---|
|
Proper technique for splicing the wires:
Tips on avoiding common mistakes:
|
Attaching The Wires
When attaching the wires for a headlight socket replacement, it is important to follow these step-by-step instructions to ensure a secure connection:
- Start by removing the old connector from the bulb. Turn the bulb counter/clockwise rotation and push the tab to release the bulb. While still pushing the tab, pull the connector from the bulb.
- Trim the wires on the new headlight connector if needed and strip the ends.
- Use a wire stripper to remove the insulation from the wire ends.
- Solder the wires together, ensuring a strong and reliable connection.
- Apply heat shrink tubing to the soldered area and use a heat gun to shrink it, providing additional protection.
- Finally, plug in the new connector to the bulb, making sure it is securely attached.
By following these guidelines, you can ensure that the wires are properly attached, preventing any connection issues and ensuring proper functionality of the headlight socket replacement.
Heat Shrink Tubing
| Heat Shrink Tubing |
| Importance of using heat shrink tubing for insulation: |
| When replacing a headlight socket, it is essential to use heat shrink tubing for insulation. Heat shrink tubing provides protection to the wires and prevents any electrical short circuits or damage. Here are some key techniques to consider when applying heat shrink tubing correctly: |
| 1. Prepare the wires: Before applying heat shrink tubing, make sure to strip the wires and trim them to the desired length. |
| 2. Slide the tubing: Slide the heat shrink tubing over the wire connectors, ensuring it covers the exposed wire. |
| 3. Apply heat: Use a heat gun or heat source to shrink the tubing. Apply heat evenly, rotating the tubing to ensure uniform shrinking. |
| 4. Inspect the seal: After heating, check the tubing for a tight seal around the wire connectors. This ensures proper insulation and protection. |
| 5. Test the connection: Perform a headlight test to ensure the replaced socket is functioning correctly with the new heat shrink tubing in place. |
| By following these techniques, you can effectively apply heat shrink tubing to replace a headlight socket and ensure the longevity and safety of your vehicle’s electrical system. |
Testing The Headlight
Testing the newly replaced headlight socket H11 is an essential step after its installation. To ensure proper functionality, follow these troubleshooting tips:
- Check for proper connection: Make sure the socket is securely connected to the headlight bulb. A loose connection can cause flickering or a malfunctioning headlight.
- Inspect the wiring: Check the wiring harness for any signs of damage or loose wires. A damaged wire can lead to electrical issues and affect the headlight’s performance.
- Test the voltage: Use a multimeter to measure the voltage at the socket. The voltage should be within the range specified by the manufacturer. Abnormal readings may indicate a problem with the socket or the electrical system.
- Consider professional help: If you encounter any issues during the testing process or if the headlight doesn’t function properly, it’s advisable to seek assistance from a professional automotive technician.
By following these steps, you can ensure that the newly replaced H11 headlight socket functions correctly and provides adequate illumination for safe driving.
Installing The New Socket
Installing the new socket for your H11 headlight is a relatively straightforward process. Here is a step-by-step guide to help you get started:
- Begin by watching a video tutorial to have a visual reference of the process.
- Start by removing the old socket. You may need to remove the headlight assembly to access it.
- Next, splice the wires of the new socket to the corresponding wires of your vehicle’s harness.
- Make sure to securely attach the wires together and use heat shrink tubing to protect the connections.
- Test the new socket by turning on your headlights.
- Finally, plug in the new socket and reinstall the headlight assembly if necessary.
By following these steps, you should be able to successfully replace the headlight socket H11 in your vehicle. Make sure to consult your vehicle’s manual or seek professional assistance if you are unsure about any step of the process.
Installing The Headlight Assembly
To properly install the headlight assembly, there are a few key tips to keep in mind. First, make sure to carefully align the assembly before securing it in place. This will ensure that the headlights are properly positioned and functioning correctly. Additionally, it’s important to use the appropriate techniques for reinstalling the assembly to avoid any damage or issues. Make sure to follow the manufacturer’s instructions and utilize all necessary tools and materials. Securing the assembly tightly is crucial to prevent any vibrations or movement while driving. Lastly, double-check all connections and wiring to ensure everything is properly attached and functioning. By following these guidelines, you can successfully install the headlight assembly and have a properly functioning headlight system.
Wrapping Up
|
Proper maintenance is essential for the longevity of your headlight socket. After completing the replacement process, it is important to conduct final checks and observations to ensure everything is in order. Here are some key points to consider:
By following these final checks and observations, you can ensure that your headlight socket replacement is successful and your headlights are functioning optimally. |
Additional Resources
When it comes to replacing a H11 headlight socket, there are additional resources that can assist you in the process. FAQ sections addressing common questions related to headlight socket replacement can provide helpful guidance. Video tutorials and guides are also available to provide further assistance. These resources can offer step-by-step instructions on how to remove the headlight assembly, splice the wires, attach the new socket, and install the headlights. They can also guide you through the process of removing the old connector, soldering the wires, and installing the new headlight bulb connector. Additional information on how to fix a headlight connector and why a headlight socket keeps burning out can be found in the provided links. With the help of these resources, you can successfully replace your H11 headlight socket.
Frequently Asked Questions For How To Replace Headlight Socket H11
How Do You Fix A Headlight Connector?
To fix a headlight connector, follow these steps: 1. Remove the headlight assembly. 2. Splice the wires carefully. 3. Attach the wires securely. 4. Use heat shrink to insulate the connection. 5. Test the headlight. 6. Plug in the new socket.
7. Reinstall the headlight assembly.
Why Does My Headlight Socket Keep Burning Out?
The headlight socket may keep burning out due to various reasons such as a faulty wiring harness, overheating, or using bulbs with higher wattage than recommended. Properly repairing or replacing the socket can solve the issue.
How Do You Remove A H11 Bulb?
To remove a h11 bulb, you need to turn the bulb counterclockwise to release it, then push the tab to release the bulb. While still pushing the tab, pull the connector from the bulb.
How Do You Install A Headlight Retaining Clip?
To install a headlight retaining clip, follow these steps: 1. Remove the old clip. 2. Insert the new clip into the headlight assembly. 3. Ensure the clip is securely attached. 4. Test the headlights to ensure proper installation. 5. If needed, make adjustments for proper alignment.
Note: It’s recommended to refer to the vehicle’s manual for specific instructions.
Conclusion
To replace a headlight socket H11, simply follow the steps outlined in this blog post. By removing the old socket and installing a new one, you can easily fix any issues with your headlight. Remember to use the appropriate tools and techniques to ensure a safe and secure replacement.
Don’t let a broken headlight socket dim your drive – get it fixed today!


