

To restore yellowed headlights, use a headlight restoration kit or a DIY solution like toothpaste or baking soda. Regular cleaning and polishing can prevent yellowing.
Yellowed headlights not only hamper the aesthetic appeal of your vehicle but can also reduce visibility during nighttime driving. Thankfully, the process of bringing back the crystal-clear shine to your car’s headlights is straightforward. The yellowing effect is commonly due to oxidation, which can be addressed with various over-the-counter restoration products specifically designed for this purpose. Now explain “How to Make Your Headlights Not Yellow?”
Alternatively, household items such as toothpaste or a concoction of baking soda and vinegar can serve as an effective solution for those who prefer the DIY route. Consistency in maintenance, coupled with protective measures like UV sealant applications, can keep your headlights looking new and enhance on-road safety.
As car enthusiasts and safety-conscious drivers seek information on headlight restoration, delivering clear, concise, and accessible content is essential for visibility in search engine results.
Introduction To Headlight Yellowing
Bright, clear headlights are essential for safe driving. Over time, however, headlights can become dull and yellow. This discoloration can limit visibility and affect the look of a vehicle. Grading why it happens is the first step to fixing it. Learn the causes and why addressing headlight yellowing matters.
The Causes Of Headlight Yellowing
Headlight yellowing occurs due to several factors that impact the condition of your car’s lights.
- UV exposure: The sun’s ultraviolet rays can cause oxidation, leading to yellowing.
- Debris impact: Regular driving exposes headlights to dust, rocks, and other debris.
- Chemical exposure: Pollution and chemicals in the air can react with headlight materials.
- Water vapor: Moisture seeping in can lead to discoloration and fogging.
Why It’s Important To Address Yellow Headlights
Fixing yellowed headlights isn’t just about aesthetics.
It’s a safety concern and might be a legal requirement.
| Reason | Importance |
|---|---|
| Visibility: | Clear headlights improve night visibility. |
| Safety: | Increases road safety by allowing better sight. |
| Value: | Maintains your car’s value and appearance. |
Tackling yellow headlights can restore their brightness and function.
Grasp Headlight Materials

Your car’s headlights are the eyes of the road. Over time, they can turn yellow and lose clarity. This not only dulls their appearance but also reduces nighttime visibility. The key to preventing and treating yellowed headlights lies in Perception the materials they are made from.
Types Of Headlight Materials
Headlights are primarily made from two materials:
- Polycarbonate Plastic: This is a tough, transparent plastic favored for its impact resistance.
- Glass: Earlier models of cars often featured headlights made from glass, which was less prone to yellowing but more fragile.
How Headlight Materials Contribute To Yellowing
Each headlight material reacts differently to environmental factors:
| Material | Contribution to Yellowing |
|---|---|
| Polycarbonate Plastic | Exposure to UV light, road debris, and chemicals can cause oxidation, leading to a yellow or foggy appearance. |
| Glass | Less affected by yellowing, though rare in modern vehicles and can still deteriorate due to environmental pollutants. |
Cleaning and restoration methods differ based on whether your car uses polycarbonate or glass headlights. Use the right approach to keep them clear and bright.
Preventative Measures For Headlight Yellowing
Keeping car headlights clear is vital for safety. Over time, headlights can turn yellow. This affects how well you can see at night. Headlight yellowing happens when they face sunlight, dirt, and pollution. You can prevent this. The following steps can help you maintain clear, bright headlights.
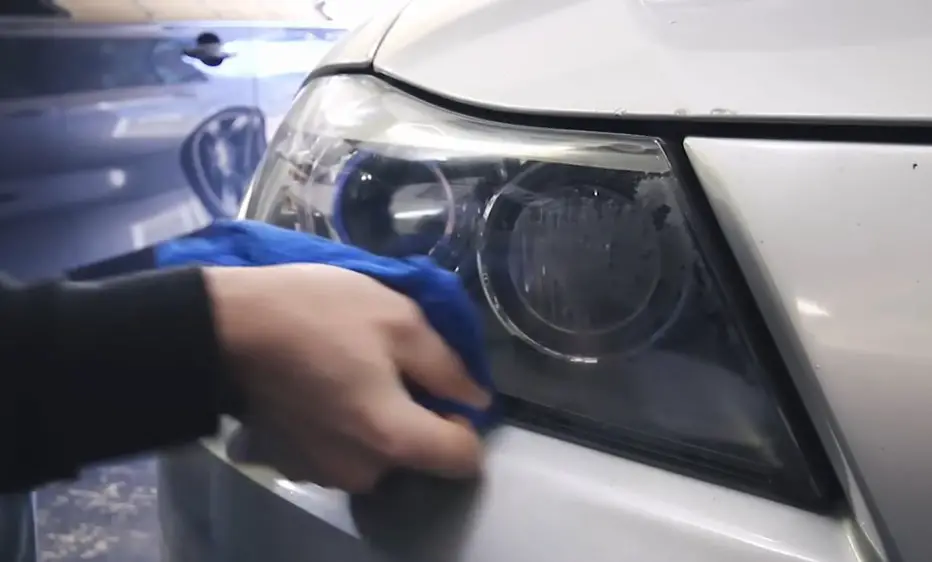
Regular Cleaning And Maintenance Practices
Clean headlights stay clear longer. Dirt and chemicals can cause yellowing. Wash them regularly. Here are easy steps for upkeep:
- Wash with soap and water often.
- Use a microfiber cloth. It’s gentle on surfaces.
- Check for damage often.
Fix cracks quickly. Water and dirt can get inside and cause problems. Waxing can also help. It adds a layer of protection. Use car-safe wax every three months.
Protective Products And Their Application
Many products can shield headlights from yellowing. They block harmful UV rays. These rays cause most of the damage. Here’s what you can use:
| Product Type | How It Helps |
|---|---|
| UV-Resistant Sealants | These add a layer that reflects UV rays. |
| Headlight Restoration Kits | They remove yellowing and apply protection. |
| Clear Protective Films | Films stick to the headlight, guarding against damage. |
Follow the instructions on these products carefully. First, apply to a clean surface. Use smooth, even strokes. Let it dry completely. Reapply as the product suggests. Most need a touch-up every year or so.
Using Household Products For Headlight Restoration

Over time, car headlights can get dull and yellow, affecting visibility. The good news is that you can restore them using common household items. This post explores effective DIY methods for headlight restoration. Grab items from your pantry or bathroom, and get ready to brighten up your path!
Vinegar Solution Method
Vinegar isn’t just for salads; it also cleans headlights! To use this natural cleaner, follow these steps:
- Make a mixture of white vinegar and water in equal parts.
- Remove the headlight covers and soak them in the vinegar solution for about an hour.
- After soaking, clean the surface with a soft cloth to remove yellowing and grime.
- Rinse and dry the covers before reattaching them to your vehicle.
Using Toothpaste As A Polishing Agent
Surprisingly, toothpaste can serve as a polishing agent. Here’s how to apply it:
- Apply a dollop of regular toothpaste to a clean cloth.
- Gently rub onto the headlight in a circular motion.
- Continue until the headlight’s clarity improves.
- Rinse off the toothpaste with water.
This affordable technique can give a new shine to your headlights with minimal effort.
Commercial Headlight Restoration Kits
Are your car’s headlights yellow or foggy? Commercial headlight restoration kits could be the answer. These kits help restore your headlights to a shine that looks almost new. In this post, we’ll walk through selecting the right kit and the steps to make your headlights clear again.
Selecting The Right Restoration Kit
Choosing the perfect restoration kit is essential. Not all kits are the same. Some cater to specific headlight types, while others boast a universal appeal. Always check compatibility with your vehicle’s make and model. Look for kits with positive reviews and that include all needed materials: sandpapers, a polishing compound, and a sealing coat.
Step-by-step Guide To Using A Restoration Kit
- Prepare the Headlights: Clean them with soap and water. Dry them thoroughly.
- Sand the Surface: Use the coarsest sandpaper to remove the yellow layer.
- Refine the Sanding: Switch to finer sandpaper to smooth the surface.
- Polish: Apply polishing compound generously and buff till clear.
- Seal: Coat with the protective sealant to prevent future yellowing.
Make sure to follow the instructions that come with your kit precisely. Wear protective gear. Take your time for the best results.
| Sandpaper Grit | Action |
|---|---|
| Coarse (e.g., 800) | Remove yellow layer |
| Medium (e.g., 1500) | Refine scratches |
| Fine (e.g., 2000) | Smooth surface |
Note: Adequate ventilation is essential during the restoration. Keep your work area well-ventilated.
Sanding Technique For Removing Yellow Stains

Over time, car headlights can turn yellow and dim. This yellowing reduces visibility, making night drives less safe. The sanding technique allows you to remove these stubborn yellow stains and revive the clear shine of your headlights. Here’s how to do it properly:
Appropriate Sanding Methods
Start with the correct sandpaper. Choose three grit levels: 600, 1000, and 2000 for a gradual process.
- Wet the headlight and sandpaper with soapy water.
- Use the 600-grit sandpaper in a circular motion to remove the yellow outer layer.
- Progress to the 1000-grit sandpaper to smooth the surface further.
- Finish with the 2000-grit sandpaper for a fine polish.
- Keep the headlight surface and sandpaper wet to prevent scratches.
Finishing After Sanding: Buffing And Polishing
Buffing and polishing are essential after sanding. They bring out the headlight’s shine.
- Apply a polishing compound to the headlight.
- Use a microfiber cloth or a buffing machine at low speed.
- Polish in a circular motion until the headlight is clear and shiny.
- Wipe away the residue with a clean microfiber cloth.
- For extra protection, apply a UV sealant to prevent future yellowing.
Polishing Compounds And Their Effectiveness

Over time, car headlights can turn yellow and dull. This is due to oxidation and exposure to elements. Polishing compounds are a go-to solution for many drivers looking to restore their headlight’s clarity. They effectively remove the yellow tarnish and bring back the original shine.
Popular Polishing Compounds
Different brands offer various polishing compounds. Each has unique features suited for headlight restoration. Here’s a list of popular options:
- Meguiar’s Headlight Restoration Kit: Includes a compound and a sealing coat.
- 3M Headlight Lens Restoration System: Contains sanding discs and a polishing compound.
- Mother’s NuLens Headlight Renewal Kit: Features PowerBall tool for efficient polishing.
- Turtle Wax Headlight Lens Restorer: Offers a multi-step process with a sealing wipe.
How To Properly Apply Polishing Compounds
To ensure the best results from polishing compounds, follow these steps:
- Wash the Headlight: Clean the lens with soap and water to remove dirt.
- Sand the Lens: Use sandpaper (if included) to gently sand the headlight surface.
- Apply the Compound: Place a small amount of the compound on a microfiber cloth or applicator.
- Polish in a Circular Motion: Rub the compound on the lens with firm, circular motions.
- Rinse and Dry: Wash off any residue and completely dry the headlight.
- Seal the Lens: Some kits include a sealant to protect the headlight from future oxidation.
Tip: Always follow the manufacturer’s instructions for the best outcome. Wear safety goggles and gloves to protect your eyes and skin.
Uv Sealants: Protecting Your Headlights Post-restoration
Restoring headlights to their original clarity offers a huge improvement in visibility and aesthetics. But the job isn’t complete without UV sealants. These sealants act as sunscreen for your headlights. They protect against the harmful effects of the sun. Let’s dive into what UV sealants are and how to apply them to keep those headlights crystal clear.
What Are UV Sealants?
UV sealants are clear coatings. They shield headlights from UV rays. This extends the life of the headlight’s restoration. The sealants form a barrier. This prevents oxidation and yellowing. It’s like an invisible shield for your car’s eyes.
Application Process For UV Sealants
To apply UV sealants correctly, follow these steps:
- Clean the headlights thoroughly. Make sure there is no dirt or grease.
- Let them dry completely.
- Apply the UV sealant evenly. Use a clean microfiber cloth or applicator.
- Allow the sealant to dry. Follow the product’s instructions for the best results.
- After drying, check for a smooth, clear finish.
Remember, to apply sealants in a shaded area to avoid premature drying. Regular maintenance with UV sealants keeps headlights clear for longer. This is a vital step after restoration. It saves time and money in the future.
Professional Headlight Restoration Services
Yellowed or foggy headlights are not just an eyesore but can also impair your vision while driving at night. While DIY methods can provide a temporary fix, professional headlight restoration services offer a durable and high-quality solution. Experts use commercial-grade products and techniques to restore clarity to your headlights.
When To Consider Professional Restoration
Understanding the right time to seek professional help can save you from potential hazards. Consider professional restoration when:
- You notice reduced visibility at night.
- Your headlights appear yellow or cloudy.
- DIY kits have failed to yield long-term results.
- You prefer a restoration that lasts longer.
What To Expect From A Professional Service
Opting for a professional headlight restoration service comes with certain expectations:
| Service Stage | Details |
|---|---|
| Inspection | Technicians will assess the damage to your headlights. |
| Cleaning | Professionals clean the surface to remove grime. |
| Sanding | Removing the yellowed outer layer comes next. |
| Polishing | Technicians polish the headlights for clarity. |
| Sealing | A protective coating is applied to prevent future yellowing. |
Service guarantees often accompany professional work, ensuring customer satisfaction. The process not only Upgrades appearance but also improves safety by offering clear night-time visibility. Professional restoration can turn back time on your vehicle’s headlights, making them shine like new again.
Long-term Care And Maintenance
Keeping car headlights clear not only improves visibility but also Upgrades the vehicle’s appearance. Engage in long-term care and maintenance to prevent yellowing. Regular upkeep shields the headlights from the elements that cause discoloration and oxidization. Adhering to a few essential practices will prolong the clarity and effectiveness of headlights.
Ongoing Cleaning Tips
- Use soapy water: A simple solution to clean the lights weekly.
- Toothpaste method: Apply toothpaste and rinse for monthly upkeep.
- Microfiber cloth: Always wipe with a soft cloth to avoid scratches.
- Headlight sealant: Apply biannually to offer an extra protection layer.
Commit to these ongoing cleaning tips to ensure headlight longevity. Consistency is key. Grime and chemicals in the environment can dim headlights quickly. Regular cleaning avoids buildup and damage.
Regular Inspection And Proactive Measures
| Action | Frequency | Benefit |
|---|---|---|
| Check for damage | Monthly | Spot issues early |
| Replace bulbs | As needed | Ensure optimal brightness |
| Polish lenses | Every six months | Restore transparency |
| UV protection | Apply yearly | Guard against sun damage |
Regular inspection and proactive measures are essential. Inspect headlights often to catch yellowing early. Use headlight restoration kits if signs of yellowing appear. Consider upgrading to higher-quality bulbs for better durability. Consistently replace weathered seals. These simple steps can significantly increase the lifespan of your headlights.
Troubleshooting Common Issues During Restoration
Restoring clear vision through your car’s headlights is crucial for safe driving. Yet, sometimes issues arise that can make this task seem daunting. This section digs into common troubles and handy solutions to bring your headlights back to a pristine, yellow-free state.
Dealing With Severe Yellowing And Oxidation
Severe yellowing and oxidation call for more than just elbow grease. A systematic approach can turn the tides on those stubborn stains. Here’s what to do:
- Wash thoroughly with soap and water to remove surface dirt.
- Apply a headlight restoration kit containing a special abrasive.
- Sand in a uniform direction, starting with coarser grits and moving to finer grits.
- Protect the newly cleared lights with a quality sealant.
Addressing Scratches And Damages During The Process
Scratches and damage can hinder the clarity of your headlights. Follow these steps to minimize their appearance:
- Identify all visible scratches before starting.
- Start sanding with a grit that matches the scratch depth.
- Progress to finer grits to smooth out the surface.
- Finish with a plastic polish for a gleaming look.
Patience is vital, and each step brings your headlights closer to a brilliant shine. Ace these techniques, and watch your headlights transform.
Ensuring Lasting Clarity And Brightness
Proper headlight maintenance is key to safe driving.
This post has shared tips to keep your headlights clear. Let’s recap and discuss safety.
Recap Of Best Practices For Headlight Maintenance
- Regular cleaning with the right products.
- UV protection to prevent yellowing from sunlight.
- Professional kits can restore headlight clarity.
- Inspection is necessary to catch issues early.
The Impact Of Clear Headlights On Driving Safety
Bright headlights mean better visibility at night.
They allow you to see clearly and react quickly.
Accidents decrease with clear headlights.
| Visibility Factor | Safety Impact |
|---|---|
| Clear Headlights | High visibility |
| Yellowed Headlights | Low visibility |
Use these practices for optimal headlight performance.
Safe driving starts with clear lights.
Frequently Asked Questions On How To Make Your Headlights Not Yellow
How Do I Get The Yellow Out Of My Headlights?
To remove yellowing from headlights, apply a headlight restoration kit or use toothpaste with baking soda. Rub the surface in circular motions, then rinse and dry for clearer headlights. Ensure to seal them afterward to protect against future discoloration.
How Can I Make My Headlights White Again?
To whiten your headlights, apply a baking soda and vinegar paste, scrub with a toothbrush, then rinse and dry. For tougher yellowing, use a headlight restoration kit with sandpaper and polish. Regular maintenance keeps them clear.
What Causes Headlights To Yellow?
Headlights are yellow due to oxidation from UV exposure and environmental factors like road debris and air pollution. Regular maintenance helps prevent this discoloration.
How Do You Make Plastic Headlight Covers Clear Again?
Restore clarity to plastic headlight covers by sanding with decreasing grits, polishing, and sealing with a UV-protectant coating. Regular maintenance prevents future cloudiness.
Conclusion
Restoring your headlights to their original clarity not only Upgrades your vehicle’s appearance but also improves safety. Simple DIY solutions or professional kits make it achievable for all. Remember, keeping headlights clear is ongoing maintenance that rewards better visibility and a fresh, clean look for your car.
Drive with confidence into the night with gleaming, bright headlights.
