
Nilight installation involves securely mounting the LED light bar and connecting it to the power source. Detailed instructions typically accompany the product for a smooth setup process.
Installing a Nilight LED light bar can dramatically improve your vehicle’s visibility and aesthetic appeal. Whether you’re aiming to enhance your off-road night driving experience or simply looking to add a stylish accessory, Nilight offers a variety of lighting solutions compatible with different vehicle types.
The installation process usually consists of mounting the light bar to a suitable location, wiring it to the vehicle’s electrical system, and ensuring all connections are watertight for durability. With a focus on user-friendly design, most Nilight products come with clear guides and hardware kits, allowing even those with minimal technical skills to undertake the installation. Remember, though, to always adhere to local traffic regulations and ensure the lights don’t blind oncoming traffic.
Assessing Your Vehicle Compatibility
Before diving into the exciting world of Nilight installations, it’s essential to determine if your vehicle is a suitable candidate for this upgrade. Illuminate the night with confidence by ensuring your vehicle meets the necessary criteria for a seamless Nilight installation experience. Each step in the compatibility check marks the path towards achieving that brilliant, custom lighting setup you desire.
Check The Vehicle’s Voltage System
Identifying the correct voltage system in your vehicle is crucial for any lighting enhancement. Nilight products are designed to function within specific voltage ranges, so matching these requirements with your vehicle’s system is the first step to a successful installation:
- Standard voltages – Most vehicles operate on a 12V system, but some trucks and heavy machinery might use 24V.
- Confirm your vehicle’s voltage in the owner’s manual or consult with a professional.
- Compatibility Check – Ensure the Nilight product you choose is compatible with your vehicle’s voltage.
Identify Mounting Locations And Space
Discovering the perfect spot for your Nilight product not only enhances its aesthetic appeal but also its functional prowess. Keep in mind:
| Vehicle Part | Considerations for Nilight Mounting |
|---|---|
| Front Bumper | Visibility and beam direction, avoid obstructions |
| Rear Bumper | Area must be free of sensors or tow hooks that might interfere |
| Roof | Ensure structural integrity and legality in your region |
Analyze the available space and confirm the dimensions of your Nilight choice fit your designated area seamlessly.
Review Electrical Connection Options
The final step involves scrutinizing the electrical connections of your vehicle. Nilight lights may require different connection types, which must be compatible with your vehicle’s wiring system:
- Direct connections to the battery.
- Connections through a switch – which may necessitate additional wiring.
- Plug-and-play connectors, if available, for ease of installation.
Consider the need for professional assistance if the process seems daunting or if complex wiring is involved. Finding the right connection option is vital for functionality and safety.
Unboxing Nilight: Components Overview
Embarking on the exciting journey of enhancing your vehicle’s lighting system begins with a single step: unboxing your new Nilight kit. Let’s explore every piece housed within its packaging and prepare for a seamless installation. This component overview will lay the foundation to set up your Nilight with confidence.
Familiarize With Nilight Kit Contents
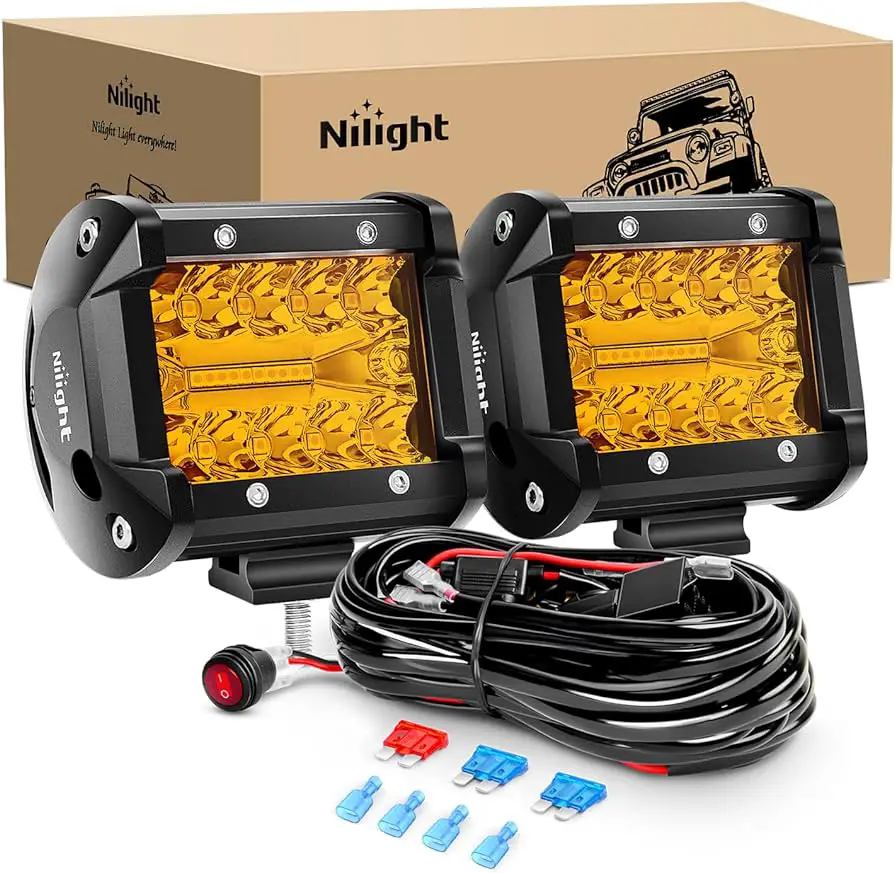
Upon opening your Nilight package, you’ll encounter a variety of components, each integral to the system’s functionality. Being familiar with these parts ensures a smooth setup process. Inside, you should find:
- LED Light Bar(s) – The centerpiece of your kit, designed to provide superior illumination.
- Mounting Brackets – Sturdy fixtures that secure the light bar to your vehicle.
- Wiring Harness – A pre-assembled set of wires, fuses, and switches to power the LED lights.
- Switch Kit – For effortless control over the LED lights once installed.
- Installation Accessories – This may include nuts, bolts, and other small hardware necessary for mounting.
Ensure that all parts are accounted for before beginning the installation to avoid any interruptions.
Understand The Function Of Each Part
Understanding the role of each component is crucial for efficient installation. Let’s break down their functions:
| Component | Function |
|---|---|
| LED Light Bar(s) | Provides the main source of light. |
| Mounting Brackets | Attach the light bar securely to the vehicle. |
| Wiring Harness | Connects the light bar to the power source with in-built circuit protection. |
| Switch Kit | Allows you to turn the light bar on and off and, in some cases, control its brightness. |
| Installation Accessories | Includes all necessary hardware to mount the light bar. |
Tool Requirements For Installation
Ready to install your Nilight LED lighting accessory? Gather the following tools to ensure you’re prepared:
- Wrench Set – For tightening nuts and bolts.
- Screwdriver Set – Useful for various components of the installation.
- Wire Stripper/Crimper – Essential for handling the wiring tasks.
- Electrical Tape – To insulate and secure wire connections.
- Zip Ties – For a neat and tidy management of wires.
- Drill (if necessary for your vehicle) – For mounting the light bar onto the vehicle’s body.
Remember: Safety comes first. Always disconnect the vehicle’s battery before working on electrical installations.
Choosing The Ideal Mounting Spots
Embarking on a Nilight installation journey necessitates thoughtful planning, especially when it comes to selecting the perfect spots to mount your new lights. This pivotal step not only ensures optimal illumination and functionality but also maintains the sleek look of your vehicle. Let’s delve into the key considerations to pinpoint the ideal locations that blend practicality with style.
Factors To Consider For Placement
Before settling on a mounting spot for your Nilight products, it’s essential to weigh several factors:
- Visibility: Choose locations that maximize the light’s reach without causing obstructions or glare.
- Beam Angle: Consider the type of beam pattern your Nilight offers and align it with the intended use for better efficiency.
- Surface Compatibility: Ensure the chosen spot can support the mount and handle vibrations during travel.
- Accessibility: Opt for areas where the lights can be easily accessed for maintenance or adjustments.
- Vulnerability: Protect your lights by avoiding areas prone to impacts or extreme wear.
Aligning With Vehicle Aesthetics
The installation should complement the overall design of your vehicle:
- Assess the lines and contours of your vehicle to find spots that maintain a natural, integrated look.
- Select mounts that match your vehicle’s style and color scheme for a seamless appearance.
- Consider symmetry and balance to create a cohesive design that enhances your vehicle’s appeal.
Ensuring Legal Compliance With Lighting
It is crucial to adhere to legal standards to avoid penalties:
- State Regulations: Investigate your state’s laws regarding auxiliary lighting to prevent legal issues.
- Light Coverage: Some areas may have restrictions on the type and number of auxiliary lights that can be used.
- Height and Angle: There may be specific requirements for how high off the ground the lights can be mounted and the acceptable beam angle.
Remember, the right placement not only enhances functionality but also ensures your vehicle remains street legal and stylistically on point.
Wiring Nilight For Optimal Performance
Enhancing your vehicle with powerful off-road lights demands not just mounting the Nilight units but also ensuring that they are wired correctly to deliver their maximum potential. Proper installation and securing of wiring are paramount to the functionality and longevity of these lights. Here’s how to wire your Nilight products like a pro for optimal performance and reliability.
Step-by-step Guide To Secure Wiring
Secure wiring is essential to prevent electrical issues and ensure your Nilight lights function properly. Follow this guide to wire your lights correctly:
- Locate a suitable mounting spot for your Nilight lights and secure them in place.
- Route the wiring from the lights towards the battery or connection point while avoiding hot spots or moving parts.
- Use relay harnesses provided by Nilight to connect your lights to the power source. This prevents overloading the vehicle’s electrical system.
- Connect the red wire to the positive terminal and the black wire to the negative terminal of the battery or grounding point.
- Secure all wires along the body of the vehicle using zip ties. Ensure there is no sagging or loose wiring that can get damaged.
- Finally, connect the switch in a convenient location within the driver’s reach for effortless control of the lights.
Tips For Waterproofing And Cable Management
Working in off-road or wet conditions demands that every aspect of your lighting system can withstand exposure to water and debris. To maintain your Nilight’s integrity, follow these waterproofing and cable management tips:
- Use heat shrink tubing to seal off any exposed wiring connections from moisture or dirt.
- Employ waterproof wire connectors especially designed for outdoor use.
- Conceal and organize wires with the help of flexible conduit to provide an extra layer of protection.
- Check all entry points where wires penetrate through the firewall or into the cabin of the vehicle, using grommets to prevent water ingress.
Testing The Electrical Connections
Ensuring the integrity and robustness of the electrical connections is crucial before embarking on any journey. Test your Nilight installation with the following steps:
- Double-check all connections for accuracy according to the Nilight wiring diagram.
- Inspect all wire routings to ensure there is no abrasion or possible pinch points.
- Use a multimeter to test for proper voltage at the light connections. The multimeter should read close to 12 volts when the vehicle is on.
- Activate the lights using the installed switch. Observe if there’s a delay, flickering, or non-operation which indicates possible wiring issues.
- Address any issues found during the test immediately to avoid damage to the Nilight system or your vehicle’s electrical system.
Illuminate Your Path: Final Adjustments
With your Nilight lights installation complete, it’s time to fine-tune their performance. The right adjustments ensure your journey remains brightly lit, no matter the terrain or conditions. Mastering the art of optimal light positioning not only enhances visibility but also ensures safe and confident driving. Follow these essential steps to bring clarity to your travels and make each journey memorable with your new Nilight lights.
Aiming Your Lights For Maximum Efficiency
Properly aimed lights are crucial for night-time driving. Adjusting the beam ensures focused lighting that can drastically improve road visibility. For the best results:
- Park your vehicle on a flat surface, approximately 25 feet from a wall.
- Use tape to mark both the horizontal and vertical centerlines of the light beams on the wall.
- Adjust the lights until the brightest spot is 2 to 4 inches below the horizontal line and right at the vertical line.
This keeps the lights directed down and away from oncoming traffic, preventing glare which could blind other drivers.
Calibration For Varied Terrains
When encountering different driving terrains, your light settings may require adjustments:
- Off-road driving: Angle your lights slightly higher to illuminate obstacles on rough terrains.
- Highway travel: Keep lights leveled to avoid dazzling other motorists.
- Inclement weather: Point lights downward to reduce reflection off fog, rain, or snow.
Remember, small tweaks can make a significant difference in light performance.
Celebrating Your Newly Installed Nilight Lights
You’ve successfully installed and adjusted your Nilight lights. Now, revel in the brilliant transformation of your vehicle’s illumination capabilities. Hit the road with confidence knowing you have taken the steps to shine brightly and safely navigate any journey. Embrace every adventure ahead with your powerful and efficient Nilight lighting setup.
Credit: www.nilight.com
Frequently Asked Questions For Nilight Installation
Does A Nilight Light Bar Need A Relay?
Yes, a Nilight light bar typically requires a relay to ensure proper power supply and switch operation for safe and efficient functioning.
How Should Led Lights Be Installed?
Turn off power before starting installation. Follow the manufacturer’s instructions precisely. Ensure the surface is clean and dry. Secure LED strips or bulbs correctly. Double-check connections for safety and functionality.
Where Do You Run Wires For A Roof Light Bar?
Run wires along the windshield frame, tucking them into the weather stripping. Feed through the firewall to connect to the vehicle’s power system. Secure wires to avoid damage.
Is Nilight Dot Approved?
Specific Nilight products are DOT approved, but it’s essential to check the approval status for each individual product model.
Conclusion
Wrapping up, mastering the Nilight Installation enriches your vehicle with durable, bright lighting. By following careful steps, this DIY project pays off in enhanced safety and style. Remember, a successful setup ensures a smoother ride, boosting your car’s aesthetic and functionality.
Drive on with confidence, knowing your Nilight is shining bright.


