

To adjust the headlight beam angle, locate the adjusting screw and slowly turn it clockwise to raise the height of the lights or counterclockwise to lower them. Make sure the most intense part of the beam hits at or just below the vertical centerline on the wall.
For horizontal alignment, adjust the screw accordingly so that the most intense part of the beam is to the right of the vertical tapeline. It is important to align both the vertical and horizontal fields for optimal headlight performance.
Understanding Headlight Beam Angle
Adjusting the headlight beam angle is made easy by finding the adjusting screw and turning it clockwise to raise the lights or counterclockwise to lower them. Ensure that the most intense part of the beam aligns with or sits just below the taped vertical centerline on the wall for optimal adjustment.
Achieve the perfect aim for your car headlights with these simple steps.
The Importance Of Proper Headlight Beam Angle
Proper headlight beam angle is crucial for ensuring safety during nighttime driving. The headlights of a vehicle are responsible for illuminating the road ahead, improving visibility and allowing the driver to identify potential hazards. When the beam angle is not adjusted correctly, it can result in compromised visibility, blinding oncoming drivers, and reducing the effectiveness of the headlights.
Without the proper beam angle, drivers may not be able to see far enough ahead or have a clear view of the road, increasing the risk of accidents. It is essential to understand the importance of adjusting the headlight beam angle to ensure optimal visibility and minimize the potential dangers on the road.
How Headlight Beam Angle Affects Visibility
The headlight beam angle affects visibility in several ways. When the beam angle is too high, the light is directed upwards, causing the light to scatter and reduce the overall effectiveness of the headlights. This can result in a decrease in the strength and range of the beam, making it challenging to see obstacles or pedestrians on the road.
On the other hand, if the beam angle is set too low, the headlights may not adequately illuminate the area ahead, reducing visibility and making it difficult to see far ahead. This can be particularly dangerous on poorly lit roads or in adverse weather conditions.
Ensuring that the headlight beam angle is adjusted correctly is essential for maintaining optimal visibility while driving. By aligning the beam angle properly, drivers can maximize the distance and range of their headlights, allowing them to see clearly and react promptly to any potential hazards on the road.
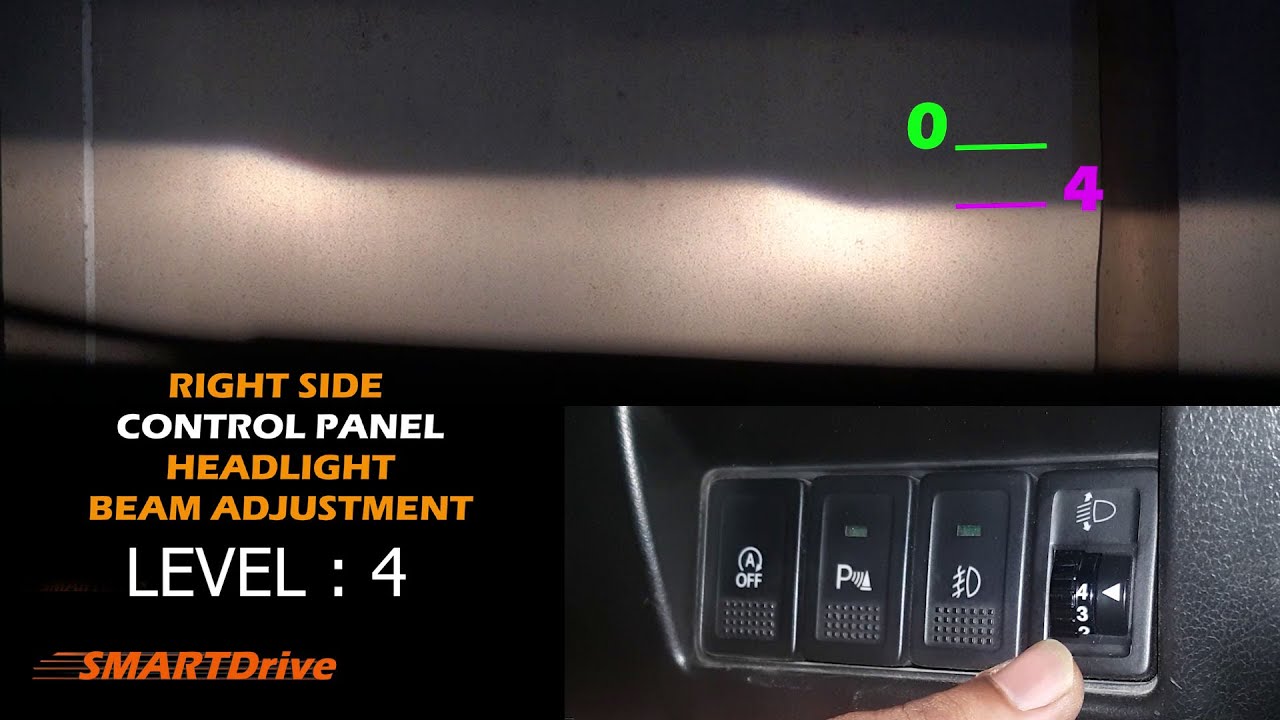
Finding The Adjusting Screw
To adjust the beam angle of your headlights, find the adjusting screw and turn it clockwise to raise the height or counterclockwise to lower them. Ensure that the most intense part of the beam hits at or just below the vertical centerline taped on the wall.
For horizontal aim, position the most intense part of the beam to the right of the vertical tapeline.
Locating The Adjusting Screw In Your Vehicle
When it comes to adjusting the headlight beam angle in your vehicle, it is important to familiarize yourself with the location of the adjusting screw. This screw allows you to raise or lower the height of the headlights to ensure optimal visibility while driving. The exact location of the adjusting screw may vary depending on the make and model of your car.
The Purpose Of The Adjusting Screw
The adjusting screw plays a crucial role in maintaining proper headlight alignment. By turning the screw clockwise, you can raise the height of the lights, while turning it counterclockwise will lower them. This allows you to adjust the beam angle accordingly, ensuring that the most intense part of the headlight beam hits at or just below the vertical centerline on the wall that you have marked.
Tips For Identifying The Adjusting Screw In Different Car Models
Each car model may have a different configuration when it comes to locating the adjusting screw. Here are some tips to help you identify the adjusting screw in different car models:
- Refer to the car’s user manual: The user manual is your go-to resource for any information regarding your vehicle. Check the manual for specific instructions on locating the adjusting screw.
- Inspect the headlight assembly: Take a close look at the headlight assembly and try to identify any visible screws or bolts. These screws are likely to be the adjusting screws that you need to turn for beam angle adjustment.
- Online resources: If you are unable to find the adjusting screw through the manual or visual inspection, consider searching online resources. Many car enthusiasts and experts share valuable information regarding specific car models, including the location of the adjusting screw.
Remember, it is essential to take your time and carefully identify the adjusting screw to avoid any damage to the headlight assembly. Once you have found the adjusting screw, you can proceed with making the necessary adjustments to ensure the proper beam angle.
Adjusting The Vertical Beam Angle
Your car’s headlights play a critical role in ensuring clear visibility while driving at night. However, if their beam angle is not correctly adjusted, it can cause discomfort to oncoming drivers and compromise your own visibility. One essential aspect of adjusting the headlight beam angle is adjusting the vertical alignment. Proper vertical alignment ensures that the most intense part of the headlight beam hits at or just below the vertical centerline on the wall. This article provides step-by-step instructions on how to adjust the vertical beam angle to ensure optimal headlight performance.
Step-by-step Instructions For Adjusting The Vertical Beam Angle
Here’s a simple guide on how to adjust the vertical beam angle of your car’s headlights:
- Locate the adjusting screw, typically found near the back of the headlight assembly.
- To raise the height of the lights, turn the adjusting screw slowly clockwise. To lower them, turn the screw counterclockwise.
- Make gradual adjustments while observing the headlight beam on a wall placed at a suitable distance in front of the car.
- Apply a vertical centerline tape on the wall to serve as a reference point.
- Aim for the most intense part of the headlight beam to hit at or just below the vertical centerline.
Turning The Adjusting Screw Clockwise Or Counterclockwise
When adjusting the vertical beam angle, it’s crucial to know which direction to turn the adjusting screw:
- To raise the height of the lights, turn the adjusting screw clockwise.
- To lower the lights, turn the screw counterclockwise.
Aiming For The Most Intense Part Of The Beam To Hit At Or Just Below The Vertical Centerline On The Wall
To achieve the ideal vertical beam angle, aim for the most intense part of the headlight beam to hit at or just below the vertical centerline marked on the wall. This alignment ensures that the beam provides optimal visibility without causing discomfort to oncoming drivers.
It’s important to note that the exact adjustment process may vary depending on your car’s make and model. Consult your vehicle’s owner manual for specific instructions tailored to your car. By properly adjusting the vertical beam angle, you can ensure safer and more comfortable nighttime driving experiences.
Adjusting The Horizontal Beam Angle
To adjust the horizontal beam angle of your car headlights, locate the adjusting screw and turn it clockwise to raise the lights or counterclockwise to lower them. Ensure that the most intense part of the beam aligns with or slightly below the vertical centerline taped on the wall.
This will prevent blinding oncoming traffic and provide proper illumination.
Step-by-step Instructions For Adjusting The Horizontal Beam Angle
To ensure optimum visibility and safety on the road, it is crucial to adjust your headlight beam angle correctly. One aspect of this adjustment is aligning the horizontal beam angle. Here is a step-by-step guide on how to adjust the horizontal beam angle of your headlights:- Locate the adjusting screw: Begin by finding the adjusting screw for the horizontal beam angle adjustment. This screw is usually located near the headlight assembly.
- Turn the screw clockwise or counterclockwise: Once you have located the adjusting screw, use a screwdriver to slowly turn the screw clockwise or counterclockwise. By turning the screw clockwise, you will raise the height of the lights, while turning it counterclockwise will lower them. Make sure to turn the screw slowly to ensure precise adjustments.
- Align the most intense part of the beam: As you make the adjustment, your aim should be to align the most intense part of the headlight beam to the right of the vertical tapeline. This positioning is important to avoid blinding oncoming vehicles and ensure optimal visibility for yourself.
Checking And Leveling Headlight Alignment
Proper headlight alignment is crucial for optimal visibility and safety while driving. Even a slight deviation in the beam angle can result in reduced visibility, blinding oncoming drivers, or missing important obstacles on the road. In this section, we will discuss how to check and level the headlight alignment to ensure your headlights are aiming correctly.
Bouncing The Car On All Four Corners To Level Out The Shocks
Before measuring and adjusting the headlight alignment, it is essential to ensure that the vehicle is level. One effective way to achieve this is by bouncing the car on all four corners. This action helps to settle the shocks and suspension, ensuring that the car is in a stable position for accurate alignment measurements.
Measuring The Distance From The Ground To Each Headlight To Ensure Level Alignment
Once the car is level, it is time to measure the distance from the ground to each headlight. This measurement will help determine if the headlights are aligned at the correct height. Using a tape measure, carefully measure the distance from the ground to each headlight. Make sure to measure from a fixed reference point on the headlight housing to maintain consistency.
| Headlight | Distance from Ground |
|---|---|
| Left Headlight | XX inches |
| Right Headlight | XX inches |
Compare the measured distances and ensure that both headlights are at the same level. If there is a noticeable difference, adjustments will be required to align them correctly.
The Importance Of Even Headlight Alignment For Optimal Visibility
Even headlight alignment is essential for optimal visibility while driving. When headlights are properly aligned, they illuminate the road evenly and provide a clear view of potential hazards. This ensures that other drivers are not blinded by your headlights and that you can see the road ahead without any blind spots. It is crucial to aim the headlights correctly to maintain a safe and comfortable driving experience.
Credit: www.youtube.com
Verifying Proper Headlight Aim
Verifying the proper aim of your headlights is crucial for ensuring optimal visibility and safety while driving at night. Misaligned headlights can cause reduced visibility for both the driver and oncoming traffic, creating potentially dangerous situations.
Using State Motor Vehicle Department Guidelines To Test Headlight Aim
State motor vehicle departments provide guidelines to help you test and adjust the aim of your headlights. These guidelines ensure that your headlights are in compliance with the standards set by the department, minimizing the risk of blinding oncoming drivers or having inadequate illumination of the road ahead.
Follow these steps to use the state motor vehicle department guidelines for testing headlight aim:
- Park your vehicle on a level surface facing a wall or garage door.
- Measure the distance between the ground and the center of your headlights, and mark this measurement on the wall.
- Turn on your headlights and observe the beam patterns on the wall.
- Adjust the vertical aim by locating the adjusting screws for your headlights and turning them clockwise to raise the beam or counterclockwise to lower it. Ensure that the most intense part of the beam hits at or just below the vertical centerline you taped on the wall.
- For horizontal aim, the most intense part of the beam should be to the right of the vertical tapeline. Adjust the horizontal aim by turning the adjusting screws clockwise to raise or counterclockwise to lower the beam.
- Continue making incremental adjustments until the beam falls within the recommended range specified by your state’s motor vehicle department.
Additional Checks To Ensure Headlights Are Aimed Properly
While following the state motor vehicle department guidelines is essential, there are additional checks you can perform to ensure your headlights are aimed properly:
- Bounce the car on all four corners a few times to level out the shocks. This helps ensure that the headlights are aligned correctly.
- Measure the distance from the ground to each headlight again after leveling the vehicle to verify that they are still level.
Troubleshooting Common Issues With Headlight Aim Adjustment
When adjusting the aim of your headlights, you may encounter some common issues. Here are a few troubleshooting tips:
- If the beam is too low, turn the adjusting screw counterclockwise to raise it.
- If the beam is too high, turn the adjusting screw clockwise to lower it.
- If the beam is misaligned horizontally, adjust the corresponding screw clockwise or counterclockwise to move it closer to the desired position.
Remember to check the aim of your headlights regularly, as they can become misaligned over time due to normal wear and tear or changes in vehicle height. Properly aligned headlights not only improve visibility for the driver, but also contribute to the safety of all road users.
Final Thoughts
Proper headlight aim is crucial for road safety and visibility during nighttime driving. Regularly checking and adjusting the headlight beam angle is essential to ensure optimal performance. In this final section, we will discuss the importance of regularly checking and adjusting headlight beam angle, how proper headlight aim contributes to road safety and visibility, and other factors to consider for the optimal nighttime driving experience.
The Importance Of Regularly Checking And Adjusting Headlight Beam Angle
Regularly checking and adjusting the headlight beam angle is essential to maintain optimal visibility and road safety. Over time, factors like potholes, rough roads, and accidental bumps can misalign the headlights, resulting in poor visibility and increased risks on the road.
By periodically adjusting the headlight beam angle, you can ensure that the most intense part of the beam hits at or just below the vertical centerline. This alignment ensures that the headlights illuminate the road properly, allowing you to see obstacles, pedestrians, and other vehicles clearly. Additionally, properly aimed headlights also prevent you from blinding oncoming drivers, reducing the risk of accidents caused by glare.
How Proper Headlight Aim Contributes To Road Safety And Visibility
Proper headlight aim plays a crucial role in enhancing road safety and visibility during nighttime driving. When headlights are correctly aligned, they provide optimal illumination, allowing you to spot potential hazards and react in a timely manner. This not only keeps you safe but also ensures the safety of other road users.
- Correctly aligned headlights prevent accidents caused by poor visibility, such as collisions with pedestrians or cyclists.
- Properly aimed headlights eliminate glare, reducing the risk of temporarily blinding oncoming drivers.
- Well-adjusted headlights offer better contrast, making road signs and markings more visible.
- Optimal headlight alignment helps you navigate curves and turns more effectively.
- Clear visibility enhances your ability to react to sudden obstacles or hazards on the road.
Other Factors To Consider For Optimal Nighttime Driving Experience
While adjusting the headlight beam angle is crucial, there are other factors to consider for an optimal nighttime driving experience.
First and foremost, it is essential to keep your headlights clean and free from any debris or dirt. Dirty headlights can reduce brightness and scatter the light, compromising visibility.
Additionally, regularly checking and replacing burnt-out bulbs is important to ensure that your headlights are functioning at their best. Dim or non-functional headlights can significantly hinder your ability to see and be seen on the road.
Lastly, consider investing in high-quality headlights and bulbs that are designed to provide excellent visibility and durability. Upgrading to LED or HID headlights, for example, can greatly enhance nighttime visibility.
By taking these additional factors into account, along with regular adjustments to the headlight beam angle, you can enjoy a safer and more pleasant nighttime driving experience.
Frequently Asked Questions For Adjusting Headlight Beam Angle
Can Headlight Angle Be Adjusted?
Yes, headlight angle can be adjusted manually using a screwdriver. There are screws that can be turned clockwise to raise the height of the lights or counterclockwise to lower them. Additionally, there are screws to adjust the horizontal field. Adjusting the headlight angle ensures proper alignment for better visibility on the road.
How Do I Adjust My Headlight Aim?
To adjust your headlight aim, locate the adjusting screw and turn it clockwise to raise the lights or counterclockwise to lower them. Ensure that the most intense part of the beam aligns with or just below the vertical centerline on the wall.
For horizontal aim, the beam should be to the right of the tapeline. Make adjustments one at a time.
How High Should Headlight Beam Be At 25 Feet?
The headlight beam should hit at or just below the vertical centerline taped on the wall at a distance of 25 feet. Adjust the screws slowly clockwise to raise the height and counterclockwise to lower them. For horizontal aim, the most intense part of the beam should be to the right of the vertical tapeline.
Adjust one screw at a time and check if further adjustment is needed. Use a screwdriver to adjust the lamp vertically and horizontally.
What Feature Adjusts Headlight Angles?
The feature that adjusts headlight angles is a screwdriver. You use it to manually adjust the angle of the bulb by turning screws or bolts located either inside the engine bay or on the outside of the light. Headlight adjustment can be done vertically and horizontally to achieve the desired aim.
Conclusion
Adjusting the headlight beam angle is an important task for ensuring optimal visibility while driving at night. By following the simple steps of finding the adjusting screws and slowly turning them clockwise or counterclockwise, you can raise or lower the height of the lights to achieve the desired beam angle.
It is also important to align the horizontal field so that the most intense part of the beam is to the right of the vertical tapeline. By taking these steps, you can ensure that your headlights are properly aimed, allowing for a safer and more enjoyable driving experience.


