
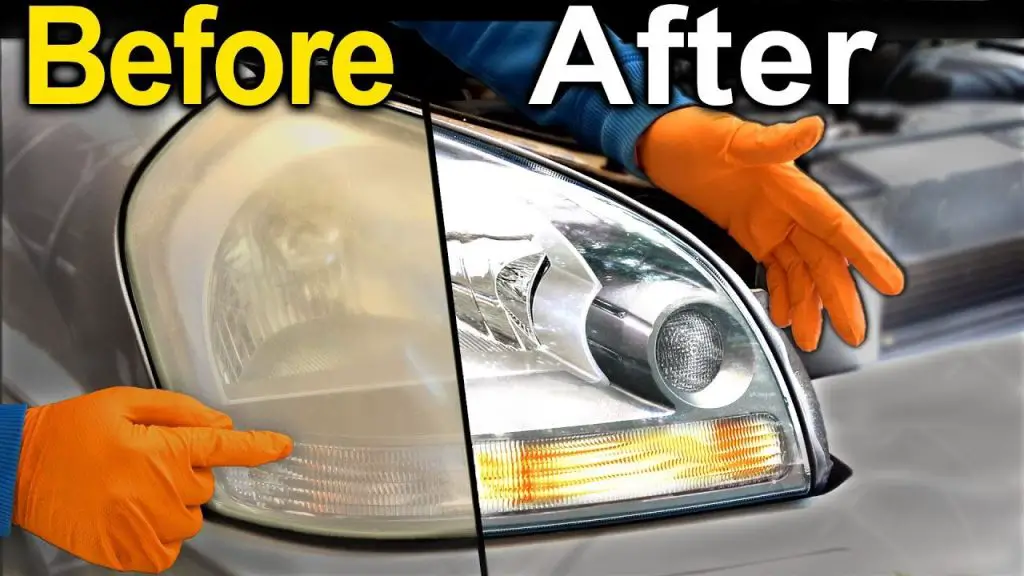
To repair your headlights yourself, start by cleaning them with soapy water. Then, you can try using toothpaste or baking soda as effective cleansers.
Alternatively, you can purchase a headlight restoration kit to restore your headlights permanently. By following these DIY methods, you can make your headlights shine like new again.
Credit: www.empireabrasives.com
Why Should You Restore Your Headlights?
Restore your headlights with a simple DIY method to make them shine like new. No need to spend money on a professional headlight restoration kit, just use toothpaste and baking soda for a budget-friendly solution. Get crystal clear headlights with this easy and effective cleaning method.
Importance Of Clear Headlights For Safety
Clear headlights are essential for maintaining optimal visibility and ensuring safety while driving. When your headlights become cloudy, yellowed, or scratched over time, they can significantly diminish their effectiveness. Poor visibility at night or during adverse weather conditions can increase the risk of accidents, jeopardizing the safety of both the driver and other road users.
By restoring your headlights to their original clarity, you can enhance your ability to see obstacles, pedestrians, and other vehicles on the road. This improved visibility allows you to react quickly and make better decisions while driving, minimizing the chances of a potential collision.
Benefits Of Restoring Headlights Instead Of Replacing Them
Choosing to restore your headlights rather than replacing them offers several advantages. Not only does it save you money, but it also preserves the originality of your vehicle’s appearance. Here are some benefits of opting for headlight restoration:
- Cost-Effective: Headlight restoration is a cost-effective solution compared to the expense of purchasing and installing new headlights. With a DIY headlight restoration kit, you can achieve similar results at a fraction of the price.
- Improved Safety: By restoring your headlights, you directly enhance your safety on the road. Clear and bright headlights provide better illumination, ensuring you can see and be seen by other drivers in low-light conditions.
- Time-Saving: Headlight restoration typically takes less time compared to the process of replacing headlights. With a few simple steps, you can restore the clarity of your headlights without the hassle of removing and installing new ones.
- Eco-Friendly: By choosing to restore your headlights, you reduce waste by avoiding the disposal of old headlights. This environmentally friendly approach contributes to a more sustainable lifestyle.
When it comes to headlight restoration, taking a DIY approach can be a practical and cost-effective solution. With easily accessible products and step-by-step instructions, you can restore your headlights to their original clarity and ensure a safer driving experience. So why wait? Take the initiative to restore your headlights today and drive with confidence.
Understanding The Causes Of Headlight Damage
Headlight damage is a common issue that many car owners face. Over time, headlights can become foggy or yellowed, reducing visibility and diminishing the overall appearance of your vehicle. Understanding the causes of headlight damage is essential in order to prevent and address these issues effectively.
Factors That Contribute To Headlight Damage
Several factors can contribute to headlight damage. By being aware of these factors, you can take proactive steps to extend the lifespan of your headlights and maintain optimal visibility on the road. Here are some key factors to consider:
- UV Exposure: The ultraviolet (UV) rays from the sun can cause significant damage to the outer layer of your headlights. Prolonged exposure to UV rays can lead to discoloration, yellowing, and even cracks in the headlight lens.
- Road Debris and Chemicals: Debris such as rocks, dust, and chemicals from the road can chip or scratch the surface of your headlights. This damage can accumulate over time, resulting in reduced clarity and visibility.
- Poor Maintenance: Neglecting regular cleaning and maintenance of your headlights can contribute to their deterioration. Dirt, grime, and dead insects can build up on the lens, obstructing the light output and making it more difficult to see the road ahead.
- Moisture and Condensation: Moisture can seep into the headlight housing through cracks or damaged seals, leading to condensation buildup inside the lens. This not only affects the aesthetics of your headlights but can also impair their performance.
- Heat and Temperature Changes: Extreme heat and temperature fluctuations can cause the headlight lens to expand and contract, leading to cracks or fogging. This is particularly common in areas with harsh climates.
Common Issues With Foggy Or Yellowed Headlights
Foggy or yellowed headlights are not only unappealing but can also pose a safety hazard on the road. It is crucial to address these issues promptly to restore visibility and ensure your safety. Below are some common issues associated with foggy or yellowed headlights:
- Reduced Light Output: Foggy or yellowed headlights diminish the amount of light that can shine through, resulting in reduced visibility during nighttime driving or in adverse weather conditions.
- Distorted Beam Pattern: The foggy or yellowed lens can distort the beam pattern of the headlights, causing scattered or uneven light projection. This can make it difficult to accurately see the road ahead or anticipate potential hazards.
- Decreased Aesthetics: Foggy or yellowed headlights can significantly detract from the overall appearance of your vehicle. Restoring clarity and brightness to your headlights will enhance the exterior aesthetics for a more polished and well-maintained look.
- Increased Risk of Accidents: Diminished visibility due to foggy or yellowed headlights can increase the risk of accidents, especially in low-light conditions or when encountering unexpected obstacles on the road.
Now that you understand the causes of headlight damage and the common issues associated with foggy or yellowed headlights, you can take the necessary steps to address these problems effectively. Regular maintenance, proper cleaning techniques, and investing in professional headlight restoration kits can help you restore your headlights to their optimal condition, ensuring maximum visibility and safety while driving.
Step-by-step Guide To Restoring Your Headlights
Learn how to restore your headlights with this easy-to-follow DIY guide. Discover the steps and techniques to make your headlights shine like new again, without breaking the bank. Say goodbye to foggy and dull headlights and experience improved visibility on the road.
Preparing The Necessary Materials And Tools
Before you begin restoring your headlights, it’s important to gather all the materials and tools you’ll need for the job. This will ensure a smooth and efficient process. Here’s a list of items you should have on hand:- Headlight restoration kit
- Masking tape
- Water
- Mild soap
- Microfiber cloth
- Sandpaper (varying grits)
- Electric drill
- Polishing compound
- Sealant or UV coating
- Protective gloves
Cleaning The Headlights
The first step in restoring your headlights is to clean them thoroughly. This will remove any dirt, grime, and residue that may be present on the surface. Follow these steps to clean your headlights:- Start by mixing mild soap with water in a bucket.
- Dip a microfiber cloth into the soapy water and gently scrub the headlights.
- Rinse the headlights with clean water to remove any soap residue.
- Dry the headlights using a clean microfiber cloth.
Sanding The Headlights
After cleaning the headlights, it’s time to sand them to remove any oxidation or yellowing. This step will help restore clarity and improve visibility. Follow these steps to sand your headlights:- Use masking tape to protect the surrounding areas of the headlights.
- Start with a low-grit sandpaper (around 800 grit) and wet it with water.
- Use gentle circular motions to sand the entire surface of the headlights.
- Continue sanding with progressively higher grit sandpapers (1000, 1500, and 2000 grit) until the headlights feel smooth.
- Rinse the headlights with clean water to remove any sanding residue.
- Dry the headlights thoroughly with a clean microfiber cloth.
Applying A Headlight Restoration Kit
Now that your headlights are clean and sanded, it’s time to apply a headlight restoration kit. These kits typically contain a polishing compound and a sealant or UV coating. Here’s how to use a headlight restoration kit:- Apply a small amount of the included polishing compound to a clean microfiber cloth.
- Gently rub the polishing compound onto the headlights in circular motions.
- Continue buffing until the headlights start to regain their clarity.
- Follow the manufacturer’s instructions to apply the sealant or UV coating to the headlights.
- Allow the sealant or UV coating to dry completely before moving on to the next step.
Polishing And Sealing The Headlights
The final step in restoring your headlights is to polish and seal them. This will enhance their appearance and provide long-lasting protection. Follow these steps to polish and seal your headlights:- Attach a polishing pad to your electric drill.
- Apply a small amount of polishing compound to the pad.
- Using the drill on a low speed, gently polish the headlights in circular motions.
- Continue polishing until the headlights appear smooth and shiny.
- Remove any residue with a clean microfiber cloth.
- Apply the sealant or UV coating to the headlights as directed by the manufacturer.
- Allow the sealant or UV coating to dry completely before using your headlights.
Tips For Maintaining Your Restored Headlights
Once you have successfully restored your headlights, it is crucial to follow some tips to ensure their longevity and keep them shining like new. Regular cleaning and maintenance, as well as taking protective measures to prevent future damage, are essential for maintaining your restored headlights in excellent condition. Additionally, it is essential to know the signs that indicate the need for re-restoration, so you can address any issues promptly. Let’s explore these tips in detail:
Regular Cleaning And Maintenance
Regular cleaning is key to keeping your headlights in optimal condition. By removing dirt, debris, and grime, you can prevent them from dulling or yellowing over time. Here are a few tips for effectively cleaning and maintaining your restored headlights:
- Start by washing the headlights with a mild soap and water solution. Use a soft cloth or sponge to gently scrub away any dirt or residue.
- Rinse the headlights thoroughly with clean water to remove any soap residue.
- Dry the headlights with a microfiber cloth or towel to prevent streaking or water spots.
- Apply a quality headlight sealant or UV protector to create a barrier against UV rays and prevent future oxidation or yellowing.
By incorporating these regular cleaning and maintenance steps into your routine, you can help extend the lifespan and clarity of your restored headlights.
Protective Measures To Prevent Future Damage
Prevention is always better than cure, and this holds true for maintaining your restored headlights. By taking some protective measures, you can minimize the risk of future damage and keep your headlights looking their best. Here are a few tips:
- Park your vehicle in shade or use a car cover to protect the headlights from direct sunlight, as prolonged UV exposure can cause yellowing or fading.
- Apply a clear adhesive film or protective coating specifically designed for headlights to shield them from scratches, chips, and debris.
- Avoid using harsh chemicals or abrasive materials when cleaning your headlights, as these can damage the lens or the protective coating.
- Regularly inspect your headlights for any signs of damage or wear. If you notice any cracks, moisture buildup, or condensation inside the lens, it may be an indication that re-restoration is needed.
By following these protective measures, you can maintain the clarity and integrity of your restored headlights, ensuring they remain in excellent condition for a long time.
Signs That Indicate The Need For Re-restoration
Even with proper maintenance, there may come a time when your restored headlights require re-restoration. It is important to recognize the signs indicating the need for this and address it promptly to maintain optimal visibility and safety while driving. Here are some common signs to look out for:
- Cloudiness or yellowing: If you notice that your headlights are becoming hazy, cloudy, or yellowed again, it may indicate the need for re-restoration.
- Diminished brightness: If your headlights appear less bright than before, it could be a sign of oxidation or damage to the lens that requires re-restoration.
- Cracks or damage: Any visible cracks, scratches, or physical damage to the headlight lens warrants re-restoration to protect the functionality of your headlights.
- Moisture or condensation: If you notice moisture buildup or condensation inside the headlight lens, it may indicate a faulty seal or damaged restoration. Re-restoration is necessary to prevent further issues.
By paying attention to these signs, you can address any restoration needs promptly, ensuring that your headlights continue to provide optimal visibility and safety on the road.
Frequently Asked Questions Of Headlight Repair Diy
How Do You Fix Your Headlights Diy?
To fix your headlights DIY, start by washing them with soapy water. Then, use toothpaste or baking soda as cleansers to make them crystal clear again. Alternatively, you can purchase a headlight restoration kit. Remember to wash the car around the lights and let everything dry before proceeding.
Can I Do Headlight Restoration Myself?
Yes, you can do headlight restoration yourself. There are various DIY methods and restoration kits available to help you restore your headlights at home. These methods may include using toothpaste, baking soda, or specific headlight restoration kits. By following the right instructions and using the right materials, you can make your headlights crystal clear again.
Does Wd-40 Work To Restore Headlights?
Yes, WD-40 can be used to restore headlights.
How Can I Make My Headlights Crystal Clear Again?
To make your headlights crystal clear again, try using toothpaste or baking soda as cleansers. You can also use a headlight restoration kit or professional headlight restoration services. Cleaning headlights with baking soda is a cheap and effective method.
Conclusion
Restoring your headlights doesn’t have to be a complicated or expensive task. With the right techniques and materials, you can make your headlights shine like new. Whether you choose to use a headlight restoration kit or DIY methods like toothpaste or baking soda, the key is to follow the steps correctly.
By regularly cleaning and maintaining your headlights, you can ensure optimal visibility and safety on the road. So, don’t let foggy or yellowed headlights dim your driving experience. Take control and give your headlights the TLC they deserve.


