

Sealed beam headlights can be restored by professionals who specialize in restoring and repairing them, offering services such as cleaning the inside of the headlight and replacing any necessary components to ensure proper functioning and improved visibility. By restoring sealed beam headlights, the benefits include easier maintenance and improved performance thanks to the use of thinner and clearer glass, resulting in brighter reflectors.
Additionally, the lack of contaminants entering the lights contributes to their longevity. Headlight restoration kits are also available for those who prefer a DIY approach.
Benefits Of Sealed Beam Headlights
Sealed beam headlights offer several benefits, including easier maintenance and improved functionality. These headlights are sealed, allowing for the use of thinner and clearer glass, resulting in brighter reflector material and enhanced visibility. Additionally, the sealed design prevents contaminants from entering the light, ensuring long-lasting performance.
Improved Functioning Characteristics
The benefits of sealed beam headlights go beyond just their sleek appearance. One significant advantage is their improved functioning characteristics. Unlike other types of headlights, sealed beam headlights are designed to be completely sealed, preventing any contaminants from entering the light. This ensures that the reflector material, responsible for directing and maximizing the light output, remains clean and unobstructed. As a result, sealed beam headlights provide a brighter and clearer beam of light, enhancing visibility and safety on the road.
Ease Of Maintenance
Maintaining sealed beam headlights is hassle-free, making them a popular choice among car owners. Unlike traditional headlights that involve intricate disassembling and replacing of bulbs, sealed beam headlights are a single unit that can be easily replaced in its entirety. This not only simplifies the maintenance process but also reduces the risk of damaging other components during replacement. With just a few simple steps, you can have your sealed beam headlights replaced and enjoy optimal performance once again.
Use Of Thinner And Clearer Glass
Sealed beam headlights utilize thinner and clearer glass, which offers several advantages. Firstly, the thinner glass allows for a more compact design, making sealed beam headlights suitable for a wide range of vehicle models and sizes. Additionally, the use of clearer glass enhances the overall visibility by allowing more light to pass through without distortion. This means that sealed beam headlights provide a more focused and concentrated beam, improving visibility during nighttime driving or adverse weather conditions. The combination of thinner and clearer glass in sealed beam headlights ensures maximum performance and safety on the road.
Introduction To Sealed Beam Headlight Restoration
Discover the benefits of Sealed Beam Headlight Restoration, including improved functioning characteristics and ease of maintenance. With sealed beam headlights, you can enjoy brighter reflector material and the use of thinner and clearer glass, resulting in enhanced visibility on the road.
Understanding The Importance Of Clear And Functional Headlights
Clear and functional headlights play a crucial role in ensuring safe nighttime driving. Not only do they enhance visibility for the driver, but they also improve the visibility of the vehicle to other drivers on the road. It is essential to have headlights that are in optimal condition, as dim or foggy headlights can significantly reduce visibility, increasing the risk of accidents.
When it comes to headlights, sealed beam headlights are a popular choice due to their durability and longevity. Sealed beam headlights consist of a single unit that integrates the headlight bulb and lens, making them resistant to water and dust intrusion. These headlights were commonly used in older vehicles and are known for their robustness.
The Need For Restoration To Improve Visibility And Aesthetics
Over time, sealed beam headlights can suffer from damage and degradation. Factors such as UV exposure, road debris, and natural wear and tear can cause them to become hazy, yellowed, or scratched. These issues not only compromise the aesthetics of the vehicle but also reduce the effectiveness of the headlights, leading to decreased visibility on the road.
Restoring sealed beam headlights is a cost-effective solution to address these problems. Headlight restoration involves removing the haze, oxidation, and imperfections from the headlight lens, restoring its clarity and functionality. This process typically involves thorough cleaning, polishing, and sometimes even applying a protective coating to prevent future degradation.
By restoring sealed beam headlights, drivers can significantly improve their nighttime visibility and overall driving experience. Clear and functional headlights not only enhance safety but also enhance the aesthetics of the vehicle, giving it a refreshed and well-maintained appearance.
Steps To Restore Sealed Beam Headlights
Looking to restore your sealed beam headlights? Follow these easy steps to bring back their brightness and clarity. From cleaning the inside of the headlight to using a restoration kit, you’ll have your headlights shining like new in no time.
Cleaning The Surface And Inside Of The Headlights
To begin the restoration process, it is crucial to thoroughly clean both the surface and the inside of the sealed beam headlights. This ensures that any dirt, grime, or oxidation is removed, allowing for a better restoration outcome. Here’s a step-by-step guide on how to clean your sealed beam headlights:- Start by detaching the sealed beam headlights from your vehicle. This can usually be done by removing a few screws or clips.
- Use a specialized automotive soap and a sponge or soft cloth to wash the surface of the headlights, removing any dirt or debris. Make sure to rinse thoroughly with water after washing.
- To clean the inside of the headlights, carefully unseal them by following the manufacturer’s instructions. This may involve removing the lens or accessing the interior through a specific opening.
- Once the inside is accessible, use a clean cloth or microfiber towel to wipe away any dust or buildup. Be gentle to avoid any damage to the delicate components.
- Once cleaned, allow the headlights to dry completely before moving on to the next step.
Removing And Replacing Damaged Or Discolored Parts
After cleaning the headlights, it’s time to identify and replace any damaged or discolored parts. This step ensures that the headlights not only look good but also function properly. Follow these steps to remove and replace damaged components:- Inspect the headlights for any signs of damage, such as cracked lenses, broken bulbs, or discolored reflectors.
- If you notice any damaged parts, consult the vehicle’s manual or seek professional assistance to find the right replacement components.
- Carefully remove the damaged parts, following the manufacturer’s instructions or using the appropriate tools.
- Install the new components, ensuring a proper fit and alignment. Pay attention to any specific instructions provided with the replacement parts.
- Double-check that all components are securely in place before moving on to the next step.
Polishing The Headlights For A Clear And Shiny Finish
With the headlights cleaned and repaired, the next step is to polish them to restore their clear and shiny appearance. This enhances their overall aesthetics and improves visibility on the road. Follow these steps to properly polish your sealed beam headlights:- Using a dedicated headlight polishing compound, apply a small amount to a clean cloth or applicator pad.
- Work the compound onto the surface of the headlights using gentle circular motions. Apply even pressure to ensure an even distribution of the compound.
- Continue polishing until the headlights appear clear and the desired shine is achieved. This may require multiple applications depending on the level of damage or oxidation.
- Once satisfied with the results, wipe away any excess compound using a clean cloth or microfiber towel.
Sealing The Headlights To Protect Against Future Damage
To ensure the longevity of your restored sealed beam headlights, it is essential to seal them properly. This protective step helps guard against future damage from environmental factors such as UV rays and moisture. Here’s how to seal your headlights effectively:- Choose a high-quality headlight sealant or protective coating that is compatible with your specific headlights. Consult the manufacturer’s recommendations if unsure.
- Apply the sealant evenly to the surface of the headlights, following the instructions provided by the product manufacturer.
- Allow the sealant to cure according to the specified drying time. This ensures a proper bond and maximizes its protective qualities.
- Finally, inspect the headlights to ensure an even and thorough application of the sealant. Make any necessary touch-ups if required.
Choosing The Right Restoration Kit
Restoring sealed beam headlights is possible with the right restoration kit. By using a specialized kit, you can effectively clean the inside and outside of your headlights, improving their functionality and appearance.
Restoring sealed beam headlights can significantly improve their performance and enhance the overall appearance of your vehicle. When it comes to choosing the right restoration kit, there are several factors you should consider. From popular brands and their features to customer reviews and recommendations, here’s everything you need to know:
Factors To Consider When Selecting A Restoration Kit
- Compatibility: Before purchasing a restoration kit, ensure that it is compatible with your specific sealed beam headlights. Different kits may vary in terms of compatibility, so it’s crucial to choose one that suits your vehicle model.
- Quality of materials: A high-quality restoration kit will typically include all the necessary materials, such as cleaning solutions, sanding pads, and UV protective coatings. Look for a kit that offers durable and long-lasting materials to ensure excellent results.
- Ease of use: Opt for a restoration kit that is easy to use, even for beginners. Clear instructions and user-friendly tools will make the process smoother and more convenient.
- Effectiveness: Research the effectiveness of the restoration kit by reading customer reviews and testimonials. Look for kits that have a track record of successfully restoring sealed beam headlights.
- Budget: Consider your budget when selecting a restoration kit. While there are affordable options available, it’s important to choose a kit that offers a good balance between price and quality.
Popular Brands And Their Features
When it comes to sealed beam headlight restoration kits, several popular brands stand out for their reliability and performance. Here are a few notable brands and their key features:
| Brand | Features |
|---|---|
| Brand 1 | – High-quality cleaning solutions – Durable sanding pads – Easy-to-follow instructions – UV protective coatings for long-lasting results |
| Brand 2 | – Comprehensive restoration kits – Professional-grade materials – Advanced polishing compounds – Quick and effective results |
| Brand 3 | – All-in-one restoration kits – User-friendly tools – Trusted by professionals – Excellent customer reviews |
Customer Reviews And Recommendations
Before making a final decision, it’s always beneficial to read customer reviews and recommendations regarding specific restoration kits. These insights can provide valuable information about the kit’s performance, ease of use, and durability. Look for kits that have consistently positive reviews and satisfied customers.
Additionally, you can seek recommendations from fellow car enthusiasts or consult online forums and communities dedicated to automotive care. Real-life experiences and feedback can help you make an informed choice and select the best restoration kit for your sealed beam headlights.
Diy Vs. Professional Restoration
When it comes to restoring sealed beam headlights, you have two options – doing it yourself (DIY) or seeking professional restoration services. Each option has its own pros and cons that you should consider before making a decision.
Pros And Cons Of Diy Restoration
Opting for a DIY approach to restore sealed beam headlights can be a cost-effective solution. It allows you to take matters into your own hands and save money on labor costs. Additionally, it gives you the satisfaction of completing a project on your own.
However, there are some downsides to consider as well. DIY restoration requires a certain level of skill and expertise, as well as access to specialized tools and materials. If you are not familiar with the process or lack the necessary equipment, you may end up causing further damage to your headlights.
Reasons To Consider Professional Restoration Services
If you want the assurance of a high-quality and long-lasting restoration, professional services are worth considering. Here are some reasons why:
- Expertise: Professional restoration technicians have the knowledge and experience to handle different types of sealed beam headlights. They are familiar with the intricacies of the restoration process and can deliver excellent results.
- Specialized Equipment: Professionals have access to advanced tools and equipment specifically designed for headlight restoration. These tools can effectively remove oxidation, scratches, and other imperfections from the lens surface.
- Guaranteed Results: When you choose professional restoration services, you can expect a guaranteed outcome. They strive to provide customer satisfaction and ensure that your headlights are restored to their original condition.
Cost Comparison And Time Investment
When comparing the cost of DIY restoration versus professional services, it’s important to consider both monetary and time investment. While DIY restoration may appear cheaper at first glance, it can be time-consuming and may require multiple attempts to achieve the desired results.
In contrast, professional restoration services often offer cost-effective packages that include the cost of labor, materials, and any necessary replacements. You can save valuable time and effort by letting the experts take care of the restoration process.
Ultimately, the decision between DIY and professional restoration depends on your skill level, access to equipment, and desired outcome. If you have the necessary expertise and tools, DIY restoration can be a rewarding challenge. However, if you want peace of mind and professional-grade results, it’s advisable to opt for professional restoration services.
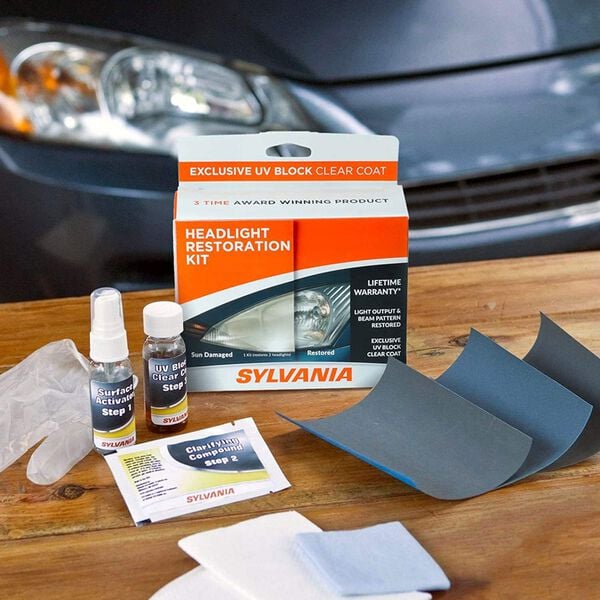
Credit: www.sylvania-automotive.com
Maintenance Tips For Keeping Restored Headlights Like New
After investing time and effort into restoring your sealed beam headlights, it’s essential to take proper care to ensure they continue to look and function like new for a long time. Regular maintenance and protective measures can go a long way in preserving the quality and longevity of your restored headlights.
Regular Cleaning And Inspection Routine
To keep your restored headlights looking crystal clear and performing optimally, it’s crucial to establish a regular cleaning and inspection routine. Follow these steps:
- Start by gently washing the surface and inside of the headlights using a sponge and a specialized automotive soap. This helps remove dirt, grime, and built-up debris that can hinder visibility.
- After cleaning, thoroughly dry the headlights with a soft, lint-free cloth to avoid water spots.
- Regularly inspect the headlights for any signs of damage, such as cracks, chips, or moisture accumulation. Catching these issues early can prevent further deterioration and costly repairs.
- If you notice any damage, address it promptly by seeking professional assistance or following the recommended quick fixes mentioned below.
Protective Measures To Prevent Damage
Prevention is key when it comes to protecting your restored headlights from potential damage. Consider the following protective measures:
- Apply a high-quality automotive wax or sealant to the surface of the headlights. This acts as a barrier against harmful UV rays, oxidation, and general wear and tear, keeping them looking glossy and extending their lifespan.
- Invest in headlight covers or protective films designed specifically for your vehicle model. These accessories provide an additional layer of defense against road debris, scratches, and environmental elements.
- Park your vehicle in shaded areas whenever possible to minimize prolonged exposure to the sun’s damaging rays.
- Regularly clean your car’s windshield and remove any debris that may scratch or damage the headlights during driving.
Quick Fixes For Minor Issues
Even with proper maintenance, minor issues may still arise. Fortunately, there are quick fixes you can employ to resolve them:
- If you notice haze or fogging on the inside of the headlights, you can use a headlight restoration kit specifically designed to remove oxidation and restore clarity.
- For small cracks or chips in the headlight lens, consider applying a clear epoxy resin to seal the damage and prevent further spreading.
- In cases of moisture accumulation, carefully remove the headlight housing and inspect the seal. Reapply a new sealant if needed to prevent water infiltration.
By following these maintenance tips and incorporating them into your regular vehicle care routine, you can keep your restored headlights looking and performing like new for years to come. Remember, proactive care is key to extending the lifespan of your restored sealed beam headlights.
Frequently Asked Questions Of Sealed Beam Headlight Restoration
What Are The Advantages Of A Sealed Beam Headlamp?
The advantages of a sealed beam headlamp include easy maintenance and improved functionality. Sealed beams use thinner and clearer glass, resulting in brighter reflectors. Their sealed design prevents contaminants from entering the headlights.
What Is The Gas Filled In The Sealed Beam Headlights?
The gas filled in sealed beam headlights is typically a combination of argon and nitrogen.
Can Sealed Beam Headlights Be Restored?
Yes, sealed beam headlights can be restored. There are professionals who specialize in restoring sealed beam headlights to their original functionality. They can replace burnt-out bulbs, clean the lenses, and restore the overall appearance of the headlights.
How Do I Clean The Inside Of A Sealed Headlight?
To clean the inside of a sealed headlight, you first need to detach and unseal the headlight. Then, use a sponge and a specialized automotive soap to wash the surface and inside of the headlight. Be careful not to damage any components while cleaning.
Conclusion
Sealed beam headlight restoration is a great option for improving the functionality and appearance of your headlights. By restoring these headlights, you can enjoy easier maintenance and brighter lights. Whether you want to convert your sealed beam to LED or simply clean the inside of the headlights, there are various methods and kits available.
Don’t let faded or damaged headlights hamper your driving visibility anymore – restore them and make them shine like new again.


